A few years ago, I showed you how to get rid of those frigid drafts coming in through your windows. Well, this year I wanted to show you how to insulate doors and get rid of drafts that make their way through your entrances. There are just a few specific areas where that cold air can enter, and likewise, there are just a few specific projects that you can do to stop them.
(This post may contain affiliate links (*). That means that I make a small commission from sales that result through these links, at no additional cost to you. You can read my full disclosure here.)
How To Insulate Doors and Get Rid of Drafts…

Step 1:
The first thing that I always look for is the door gap. (that’s the space between the edge of the door and the frame. It should be 1/8″ or narrower. Quality weather stripping* can usually handle up to 1/8″ with no problems, but anything past that and you start to get into questionable territory. This is where most of the drafty air sneaks in. I wrote a post on how to make adjustments to your door gap, a few years ago. If you notice that you have a problem with this, you should make these adjustments first.

Step 2:
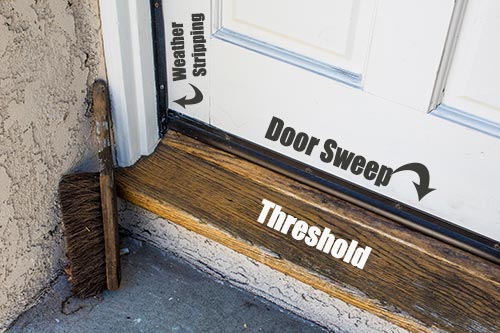
Now onto step number two. This is when you want to inspect your weather stripping,* your door sweep* and your door threshold.* The purpose of these are to seal the minute spaces around the perimeter of your door. Your weather stripping should look plush and not have any tears or cracks. If it is old and damaged, it may be a good idea to replace it. Likewise, the door sweep should be in good working condition.
Step 3:
The threshold’s purpose it to seal the gap at the bottom of the door (in conjunction with the door sweep). It also helps to keep out spiders and other bugs. It can be adjusted by tightening or loosening the screws. Adjustments should only be made after the door gap has been set to right. Then, if the door is rubbing against the threshold, or if there is a wide space at the bottom of the door, the threshold should be adjusted.
Step 4:
For that extra protection against bugs and drafty air, a door sweep* is added. This will further close the gap between the threshold and the lower edge of the door. Check to make sure that you have one and that it is in good condition. If not, now is a good time to replace or add one. They come in many different finishes and are easy to install.

Step 5:
For the ultimate insulation against cold air and heat loss, you need to make sure that there is insulation between the door frame and the wall of your home. Most builder’s grade homes do not have this extra benefit. However, you can do this job yourself. You will be amazed at how much of a difference it will make.
To inspect your door, you will need to remove one side of the door casing, and possibly a small strip of sheetrock. (check out my post on doing this same project on my windows). If there is no foam insulation between the door frame and the stud next to it, you will need to move onto completing this project. However, if you already have insulation between the two, you can replace the casing and move on to other things!
To add this extra bit of insulation, continue to remove the remainder of the door casing. Be extra careful when doing this to not damage your casing or your wall. You can prevent damage to your paint by scoring a line around the perimeter of the casing. (again, see how I did this on my windows).

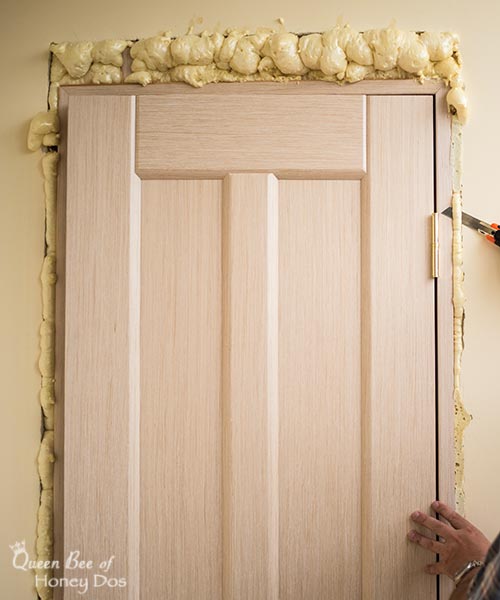
Now, once the casing is completely removed, you should fill the space with a spray foam insulation.* NOTE – do not use just any old can of spray foam. You need to make sure that you are using one that is intended for doors and windows. Any other foam can put too much pressure on your door/widows and cause the frames to bend out of shape. I always use Great Stuff for door and windows.*

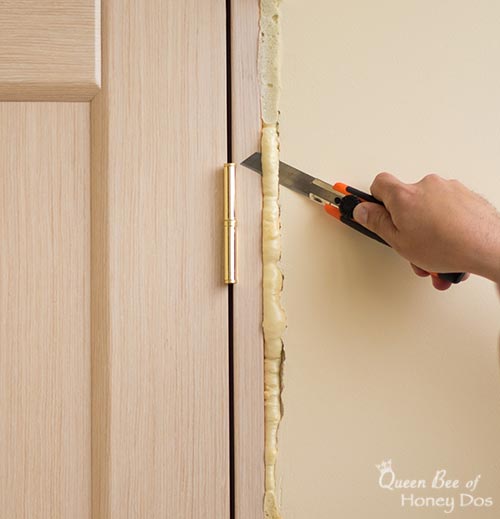
After the entire area has been filled with insulation, allow it to dry overnight. Then use a sharp utility blade and slice off all the foam that extends out beyond of the wall. You want to get it flush with your sheetrock, so that the casing will lay flat.
Finally, install your door casing back the way that it was. Then, touch up with some caulk and paint. After you finish this project, you can rest comfortably knowing that your door is weather tight! But, if you want some more tips on other ways to reduce your utility bill, be sure to check out these 27 tips!

– PIN IT –

– PIN IT –

Please keep it clean. Comments that do not follow the Comment's Policy may be removed.