Not long after building my garage/workshop shelves, I saw that there was definitely room for more improvement. Being a blogger who does a whole lot of woodworking, I didn’t relish the idea of all of my junk being on display during video demonstrations, so I decided that I would enclose those storage shelves and turn them into cabinets!
In addition to increasing the value of my home, enclosing those storage shelves will provide a lot of protection from humidity and dust. Like most workshops, both humidity and dust can play havoc on tools and stored items. So, this was a no-brainer for me.
Luckily, converting storage shelves into cabinets is a whole lot easier than you might think. In fact, I found that my garage shelves were perfect for this type of upgrade! (FYI – this is part 2 of my garage makeover. If you missed part 1 on how I built these shelves, you can go back and find it here.)
(This post may contain affiliate links (*). That means that I make a small commission from sales that result through these links, at no additional cost to you. You can read my full disclosure here.)
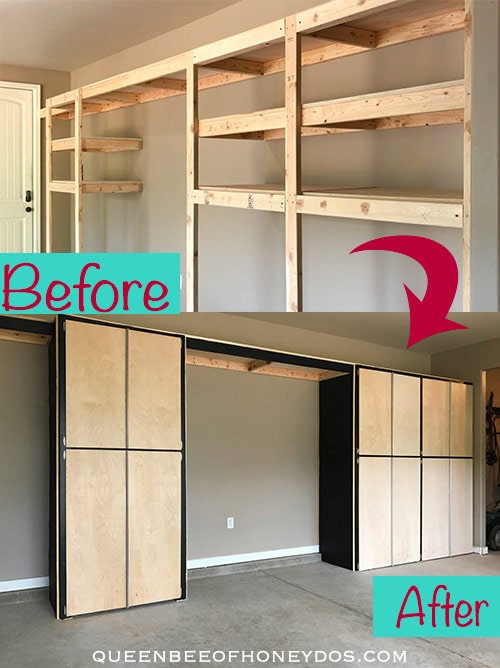
How To Enclose Storage Shelves
Choosing a Style:
For me, the first thing that I had to decide on was the color scheme. I played around with the idea of painting the cabinets some sort of vibrant teal shade. Eventually, I decided against that as I feel that color might wear thin with me after a while and I just want these to look good without having to worry about what the next color trend will be.
The next thing that I needed to decide was the style. Yes, I could have gone all out and built shaker doors to enclose these storage shelves. But, I wanted these to look like they were designed for a garage or workshop and not meant for a kitchen. I was also looking for quick and easy assembly.
With all that in mind, I ended up going with an unfinished flat panel door combined on a black body. Although the rest of my house is nothing like the style I used in my garage, I thought that most could appreciate a sleek modern finish in a garage, regardless of their preferences for the inside of their homes. Plus, it gives me the chances to branch out and show that I can do many other styles besides what you have already seen here before.
Material Used to Enclose Storage Shelves
Since most of the construction will already be complete, there are not very many things required to convert these shelves into cabinets. I used the following:
- 2x4 lumber
- plywood ( I used 1/2″ but recommend 3/4″ – more on that below)
- wood screws
- traditional hinges* (European hinges can also be used)
- continuous drawer/cabinet pulls*
- door latches* (optional)
- primer
- paint or stain of choice
- sealant for unpainted surfaces
Full video available down below. Also, be sure to follow my Youtube channel for more DIY videos and to catch all the rest of this makeover!
Process to Enclose Storage Shelves
Step 1 – Build the Face Frames
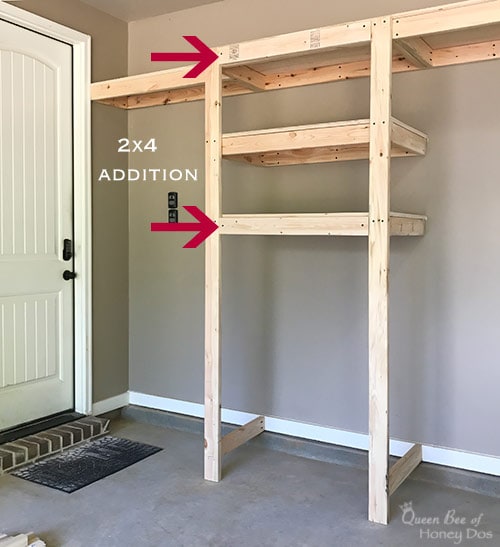
To begin converting these into cabinets, I started by using 2x4s to create a solid face frame. If you will remember in part 1, I added legs to the front of the shelving. Those legs created a 1.5″ problem when it came time to add doors.
When cabinets are constructed, they will either have a face frame or they will be faceless. I needed these to be one or the other. So, just by adding in a horizontal 2x4 to fill in the voids between the legs, I was able to create a flush surface for the doors to mount to. So, basically, I built face frames.
To do that, I just measured and cut the 2x4 to fit the space. Then, I screwed the boards in place with a few wood screws. NOTE – I made sure the screws were recessed and used some wood putty to hide any defects or holes.
Step 2 – Primer and Paint Shelves
Once the face frames were assembled, I primed every surface that would be receiving paint. For my shelves, that included all of the 2x4 framing. I did not apply any finish to the plywood shelves.
Step 3 – Build the Cabinet Doors
Next, I cut the doors out of 1/2″ plywood. However, I would really recommend using 3/4″ plywood if you are doing a flat panel or if you think that your doors will be subject to rough treatment.
In my case, I was trying to use up the plywood that I had on hand, and I also know that I am the only one who ever ventures into my workshop space. So, I am not worried about rough treatment being heaped onto my doors. I know they will hold up just fine.
Step 4 – Install Cabinet Doors
I decided that I would use traditional hinges for my panel doors. Mostly because you can’t install euro-style hinges on 1/2″ doors, but also because they are quick and easy to attach. You will notice that I did not recess my hinges into the panel door, but instead just surface mounted them. I only did this because, again, they can’t recess into 1/2″ doors. I recommend recessing these if you use 3/4″ and you have the skill.
If you decide to flush mount your hinges, just know that you will either have to do inset doors, or you will need to add bumpers to keep the hardware from rubbing against the paint. I designed my doors to overlay the framing and then used some of those anti-skid floor protectors* to buffer the hinges. It’s a cheap solution that will hold up long term.
Tricks to Hanging Cabinet Doors:
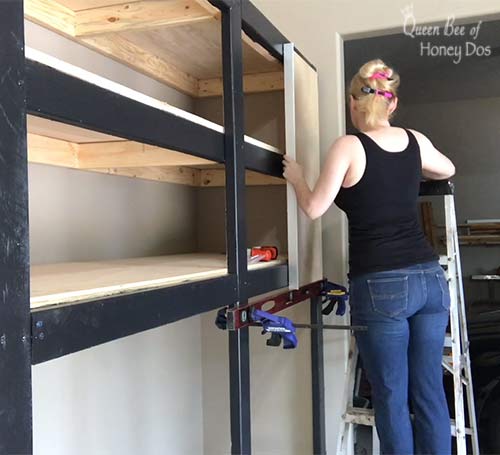
When I got ready to install my doors, I used my level as a tool. It is perfect for this type of job because it will always result in perfectly level doors, and it gives you a ledge to rest the doors on while you work. Just clamp it in place and start hanging those doors.
For any adjacent doors, I just moved the level over and aligned it with the bottom edge of the previous door. This way they will all hang straight and even with each other. If you happen to notice that the doors are not aligning properly, stop and make adjustments as needed. For european hinges, the alignments can be made by adjusting the screws. (Instructions for aligning cabinet doors, here).
For the bottom doors, I marked where I wanted the top edge of the door to rest. Then, I used shims to raise the door to that mark. You can use the level to get the sides and center-aligned with the top door. However, I found that these can be done mostly just by eye-balling it.
To keep the doors close tightly, I added some magnetic catches. You will need one catch for each door. The ones listed above come in packs of 4 and were the sturdiest that I could find. Those plastic ones tend to break and can be aggravating to install.
About My Door Hardware:
Since I was going for a sleek, professional, cabinet design, I decided to install full-length pulls. That is what you will find on the metal cabinets that are sold for use in workshops and/or for tools. I love the way they look and wanted to recreate the same thing on mine.
I found this company out of California that manufactures and sells to construction companies. They have some of those pulls that you see on large filing cabinets and on industrial type storage cabinets. A quick search also shows that they offer some of their products on Amazon.
They don’t have a lot of reviews on Amazon, yet. But, I didn’t really expect that they would because unfinished building goods are just not something that most people think to purchase through Amazon.
I ended up having to special order their bulb pull because I used 1/2″ panels. Most of their pulls are designed for 3/4″ doors. My favorite pull is this continuous drawer pull.*
These come in 8 ft sections. However, some versions have cheaper shipping if you order 6 ft sections. Which is what I ordered. The style dictates how they are installed, but I didn’t have any issues with either of the varieties that I used.
I did notice that the one review on Amazon for the pull just mentioned about has a single 1 star. They said they couldn’t push it onto the door. All I can say is that they are not suppose to slide on that easy. Otherwise, they would come off too easily, as well.
To attach the pressure fitted pulls, I found that they require a rubber mallet and light but firm taps. You should begin from one end of the front edge and work consistently towards the other end. Don’t jump around.
One tip – I felt that these went on easier when I tapped them down the door (top to bottom) instead of attempting to push it over the front edge. Regardless, they are not difficult to get on, you just have to understand that they are not meant to snap on with just finger pressure.
You can also drill through the back of the aluminum and add some screws. Which is what I did. I ended up using 1/2″ lathe screws. I found these to be the best for an easy application. Just keep in mind how your doors will mount on the frame. You want to avoid placing screws where the door will rest against the frame.
Step 5 – Install the Side Panels
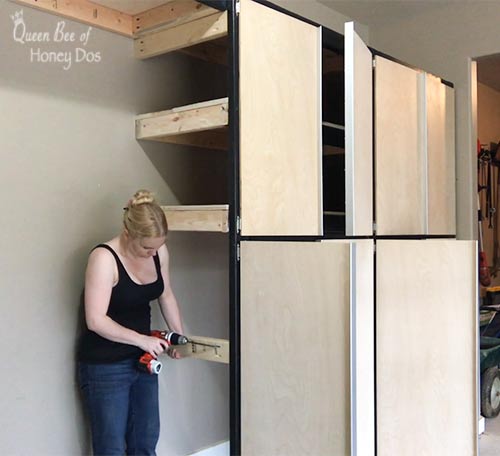
When I got around to working on the side panels, I realized that I needed a few more supports in place. Since I had left an open bay area at the bottom of my shelves, there really wasn’t much there to support the side panels. So, I just went back and, using the same method as I used during the previous build, added a few more supports where I felt they were needed.
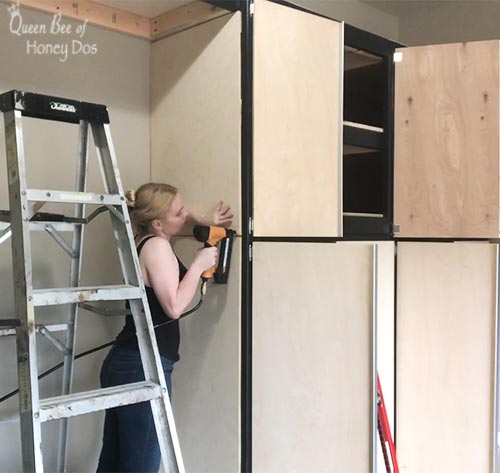
Then, I attached the panels using my nail gun. Now, you will notice that I did not use one full-length panel on my enclosure. I only did mine this way because I had leftover plywood that I wanted to use up. So, I cut my panels down to align with the doors. However, if you want to get a completely seamless look on the sides, you may want to use a single section.
Step 6 – Install Desired Trim
To achieve a clean edge along the top shelf, I added a 3/4″ strip of molding. I didn’t do anything special here. I just used some more leftover plywood and ripped it down to 3/4″ wide and nailed it in place with a brad nailer. If you want to get elaborate, you could use crown molding.
To cover the edges of my side panels, I used some corner molding. In the images and video, I haven’t yet painted the trim. I keep going back and forth on whether I want it black or natural.
Step 7 – Apply Final Coat of Paint and/or Sealant
I applied a wipe on sealant to the unfinished doors, last. You may prefer to do that prior to hanging them, but since they can be left open to dry, I find that the application is easier when they are already hanging.
If you are using paint, you will want to do that before installing the hardware. You can refer to my post on building a kitchen island to see how I get perfect paint results when painting wood.
Finally, I went back and painted the side panels and touched up any areas that needed it. And that was it. It took me just a few hours to enclose these storage shelves and they look like high-end cabinetry! How’s that for convenience?
Final Comments:
This is part 2 of my garage/workshop makeover. I hope that you will join me for the remaining projects. I have a lot of storage projects coming up. If you missed part 1 you can go back and see it here.
You may also be interested in how to build cabinet boxes or check out my 3-way convertible workshop table. It is perfect when you need to have several small work areas but with the added benefit of converting into one large surface.


Dog Backpack says
Thanks for finally writing about >How To Enclose Storage Shelves o
Queen Bee of Honey Dos <Loved it!
Rachel Lynn says
Anytime!
Alice Tyser says
i reached out to Orange Aluminium and they do not carry any stock 1/2″ hardware for the cabinet doors. what did you order from them for your doors. They said to do a special run it is $650 dollars plus the cost of the hardware. What exactly did you order and what was the cost?
Rachel Lynn says
Alice, When you go to their site, click on the drawer pulls. Then go to the “angle bulb pull” section. I used the clear anodized (sku # OA5088-6A). Order them in 6 foot sections to avoid the heavy freight charge.