I have reached that point where I am sick of looking at the paint colors on my wall. Of course, that happens to me about every 5 years. As a result, I have begun to change the paint color in several parts of my home, starting with my studio. Since I started repainting, I thought this would be a good time to share my tips and tricks for getting a professional interior paint finish.
(This post may contain affiliate links (*). That means that I make a small commission from sales that result through these links, at no additional cost to you. You can read my full disclosure here.)
Getting a Professional Interior Paint Finish – Prepping…

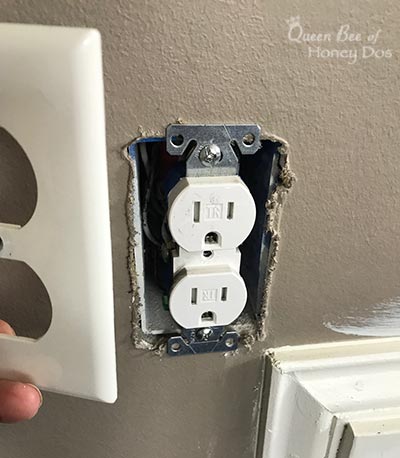
Remove Outlet Covers:
You should always remove covers from your outlets, light switches, telephone plug, and any other component that has a cover. Yes, you could always tape around these areas, but if you ever need to remove the cover for repairs or to replace them, you will have a hard time getting things back in perfect alignment.

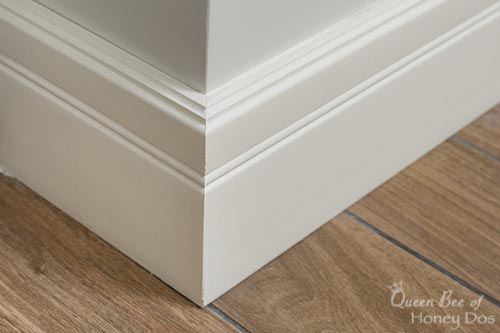
Clean Base Boards and Trim:
This is something that a lot of people don’t think about doing before painting, especially when painting walls. However, once you start cutting in around the baseboards and trim, your brush will quickly pick up dust and debris. This will then be transferred back into your paint and onto your walls. Pay particular attention to the trim above doorways. This is a haven for dust.
Lay Protection:
It goes without saying that you want to protect your floors and furnishing from paint splatter. I like to move all the furniture to the center of the floor and use one large canvas drop cloth* to protect it. Then, I lay protection down around the perimeter of the room.
My preference for the perimeter is to use these 4’x12′ canvas tarps.* The size is perfect for renovation projects because many rooms range between 12′ – 16′ in length. The four feet in width on these canvas drop cloths are also the perfect width for most stairs and hallways.
Patch Nail Holes:
Before one drop of paint touches the wall, it is best to patch all those nail holes that have been made over the years. It only takes a few minutes to do this, and the final result is much more professional looking.
Tape Off Areas:
Although I am not a regular user of painter’s tape, if you have any doubts about your ability to paint around surfaces in a neat manner, you should probably tape them off before beginning. If you do choose to use painters tape, be sure that the tape adheres completely to the surface.
When removing the tape, Joanna Gaines suggests that the perfect time is just when the paint becomes tacky. This will prevent those awful jagged lines. However, if your paint has passed that tacky point, then you should leave it until it is completely dry. Then, score the tape before removing.
Mix Multiple Cans:
If you are doing a project that requires more than one can of paint, you should try mixing the cans together into a 5 gallon bucket. This will eliminate the chance that one can will have a slightly different hue than the others.
Although in this day and age, color mixing rarely has any noticeable color variations, it never hurts to take this extra step. It is especially important if you are using paint from different stores.
For example, I once purchased a color from Sherwin Williams. A few months later, I bought a gallon of the same color and sheen from Benjamin Moore. Before beginning the job, I thought that I may need to use what I had from both stores to cover the whole area. So, I tried them side-by-side on my sample board. There was a slightly noticeable difference. But, with mixing the two, the difference was removed.
Strain Old Paint:
Speaking of old paint, if you plan to use any paint that has been sitting around for a while or any paint that has been previously used, I highly recommend that you strain the paint prior to use. Paint has a tendency to accumulate dust particles and flakes of dried paint. These particles can be transferred to your walls and cause a headache. Pouring the paint through a filter will remove all these contaminants and restore your paint to a fresh clean state.
Getting a Professional Interior Paint Finish – Materials…
Buy Quality Brushes:
If you use poor quality materials, it is very likely to show in your paint finish. At the very least, it will present you with your fair share of problems. Cheap paint brushes don’t hold the bristles in place the same way that a quality brush does.
If you have ever had to pick bristles out of your paint or sealant, you know how annoying that can be. One of the most popular brands of brushes used by professional painters are the Purdy brushes.* But remember, synthetic brushes are best for water-based applications and natural brushes are for oil based.
The same thing goes for roller brushes. Cheaper brands typically use a glue adhesive that begins to degrade as soon as the paint touches it. This leads to a constant release of fibers. In addition, they rarely can be used more than once or twice before needing to be thrown out. Where a good quality brush will last many applications. My go-to roller cover is a Purdy 1/4″ nap.*
Use Correct Nap:
As important as the quality of a roller cover is the nap. If you are painting over a smooth surface, such as drywall, and want to maintain as smooth of a surface as possible, then you need a short nap. The most common would be a 1/4″ nap.*
Longer naps will create more of a stippled effect, and the longer they are the more stippling you will get. Longer naps also cause more foaming with gloss and semi-gloss paints.
Longer naps are well suited to textured surfaces, such as stucco. They also work well when creating certain effects. As long as you choose your naps accordingly, you will be better pleased with your results.
Prep Your Brushes:
In addition to getting a quality brush, you also want to take a few moments to prep them before using them. With a new brush, you should always flick it against a table or the side of your hand to remove any loose bristles.
Now, that’s not to say that quality brushes lose their bristles, but every brush has the potential of having a few bristles that didn’t get bound during manufacturing. So, flick those brushes good.
It is also a good idea to dip them in some paint and swipe them over a newspaper a few times. Clean them once, and they are good to go.
With roller brushes, if you are using a high-quality brand, you should not have much fuzz on a new brush. Rolling a lint brush over the surface should remove any loose fibers. From then on, you shouldn’t have to worry with fuzz balls coming off on your walls.
Use Proper Tools to Remove Lids:
If you plan to save leftover paint, you need to make sure that the lids will seal back tightly. The best way to do that is to prevent damage to the lid. I have seen people try all sorts of ways to open a paint can, including using pliers, scissors and even nails.
You can generally get away with using a flat head screw driver, but they do make tools for this specific need. The lids come off very easily with a paint can opener.* They even make openers for 5 gallon sized paint,* which I highly recommend.
Paint Tray Liners:
I always use liners to keep my trays in pristine condition. Using an old tray that has stuck-on paint is just asking for problems. That stuck-on paint will begin to soften after sitting in fresh paint for a while. It also will deposit stray pieces of paint chips into the mix.
So, I just place a fresh liner in my trays each time I paint and then dispose of them afterward. In a pinch, you can cover a tray with Saran wrap, but I usually just buy this 20 pack* for less than $1 each!
Getting a Professional Interior Paint Finish – Painting…
Primer Walls:
If you are starting out with new walls or walls that have a strong contrast to the new color, you should use a primer first. Primer will seal the pores in a new wall and save you quite a bit in paint. Without primer, drywall can absorb a fair amount of paint.
Likewise, using a tinted primer to cover dark colors, such as red, can go a long way at getting the job finished in a timely fashion.
Choose Correct Sheen:
Choosing the correct sheen is almost as important a choosing the correct color. You can use whatever sheen you want, just remember that the glossier the paint finish, the easier it will be to clean, and the more light it will reflect. I like to use semi-gloss, satin, or egg-shell on my walls, and ceilings.
That’s right, I rarely ever use flat paint, even on ceilings. I just don’t like it. It tends to make the ceiling look blah. Even in my theater room, I used Sherwin William’s matte finish. I normally go with the lightest sheen available for ceilings, but never flat. But, that is a personal preference.
Many contractors use flat for living rooms and bedrooms, and only use semi-gloss and satin in the kitchens. Designers tend to go with what is visually pleasing and functional, regardless of the standard method.
To each his own, I guess. Just keep in mind that the color cards at the paint store are normally shown in flat. The color will look a bit richer if you choose a sheen.
Cut In:
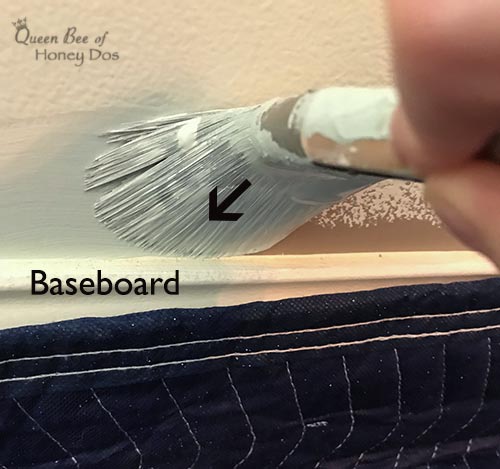
When I start painting my walls, or even a piece of furniture, I do all of the cutting-in first. I rarely use painter’s tape to cover my baseboards, trim, or ceiling lines. I just go at it with a good quality, angled, brush. It does take a bit of practice to be able to get a straight cut line, but I am positive that you can learn to do it, too.

My method is to make sure the brush is loaded with paint, but not saturated. (FYI – I use a 3 inch angled brush). I dip, and then, very lightly wipe each side. I don’t want it to have any runs, drips, or globs while I am cutting-in.
In fact, I prefer to have too little paint on my brush than to have too much. I am right-handed, so I tend to brush from left to right. Along the baseboards, I tend to use the center bristles as my leading edge. As you can see, my brush is well coated, but it is not wet enough to leave excess paint above or below the brush line.

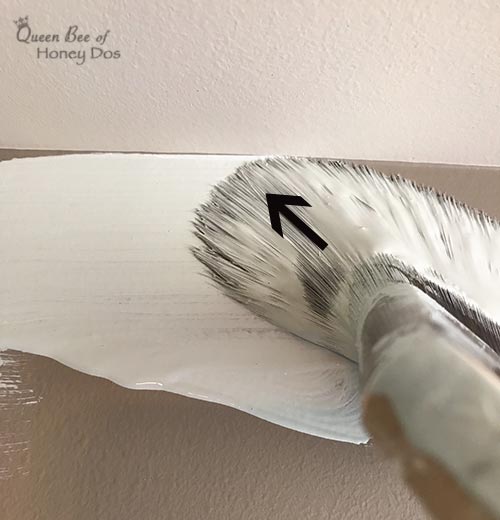
When I cut in around the ceiling, I tend to use the long side of the angled brush as my leading edge. Since the ceiling is the reverse of the floor, you shouldn’t be surprised that you need a slightly different technique for both.
Here, I am not as concerned about a bit of paint overload, because it will move away from the ceiling. My method is to begin about 1″ away from the ceiling, press firmly to fan the bristles out and upward. Then, move the tips just along the corner.
You can learn the cutting-in technique by placing a long strip of painter’s tape horizontally onto a wall (preferably one that you will soon be painting). Then, practice getting as close to the tape’s edge without getting any paint on the tape. Use the bottom edge of the tape to simulate cutting-in at the ceiling, and the top edge to simulate cutting-in along baseboards.
Paint One Section:
Once you begin to use your roller, try to work in sections. You can actually go in whatever direction that you like, but I have always used the “W” method. I paint a big W with my first strokes then I begin to fill in by moving the roller back and forth in a sort of V shape. This way, I complete a section before any parts of it begin to dry.
Once paint begins to dry, it is best to not run your roller back over that area. This is why the “W” method is often recommended. By the time you finish that section, you are ready to reload your roller and move onto the adjacent areas.
Avoid Hard Pressure:
When using a roller brush, you shouldn’t have to apply hard pressure. Applying too much pressure can cause creasing. (raised lines of paint created by the edge of a brush) To avoid these creases, use firm but even pressure.
If you do notice creases forming, be sure to quickly smooth them out before they have a chance to dry. Then, let up on the pressure a bit.
Use Saran Wrap:
For jobs that require several days to complete, or if I just want to take a break, I use Saran wrap to temporarily seal my brushes and pans. This keeps me from needing to clean everything until I am completely finished.
Getting a Professional Interior Paint Finish – Clean Up…
Wipe Bucket Lip:
It is always a good idea to wipe the paint can rim between each pour. If you allow it to settle and dry, the lid will not fit back tightly. This will cause your paint to degrade and shorten its life. So, try to keep a few paper towels handy to wipe down the rim.
Seal Cans Tightly:
Along that same line of thought, make sure the cans are properly closed before storing paint. Air is the enemy of paint. So, as much as you can prevent air from reaching the paint, you should. Tap lids down with a mallet or hammer to ensure a tight seal.
Properly Clean and Store Brushes:
Once your paint job is finished, always thoroughly clean those brushes. Paint that is allowed to dry in a brush will warp and pull the bristles. Even a small amount can cause damage. If you take care of your good brushes, they will take care of you.
Final Tip…
If you have a dog that sheds, don’t let him/her in the room until the paint is dry. (Guess how I know this. lol)

– PIN IT –

– PIN IT –


Please keep it clean. Comments that do not follow the Comment's Policy may be removed.