I have this closet that I have been ignoring for a while. It is connected to my studio and editing room, so I have been using it for storage. However, up until now, it had just been a small room crammed full of junk. Well, I finally got around to cleaning it out, and decided that I really should finish it out as an actual closet. The problem was that I didn’t want to spend the money for a system in a closet that will not see very much use. So, rather than go out and purchase a kit, I decided to use some left over melamine boards to make my own easy DIY closet system.
(This post may contain affiliate links (*). That means that I make a small commission from sales that result through these links, at no additional cost to you. You can read my full disclosure here.)
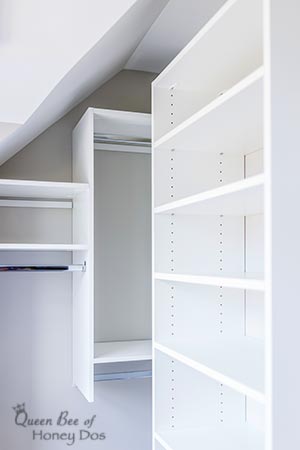
If you have looked at any of the closet systems that are available, you probably already know that a very basic set up runs around $200. Even the individual sections can cost around $100. From there, you can add drawers and shelves and custom components till your heart’s content. The great thing about these kits are that they are so easy to install and give quick results.
That being said, sometimes you may want to get a basic system on a tight budget. That, my friend, is where this post may help you. Did you know that the same melamine boards that are used in the “wooden” closet systems can be purchased for about 1/3 the cost that they charge for the kit. The only difference is that the kits come with predrilled holes and slots. Now, if you are up to dedicating a small amount of time and energy, you can drill those same holes yourself.
Making the Most of Materials…
Most closets only need panels that are 48″ in length, with the exception of shelves that need to reach all the way to the floor. (kits come standard with either 48″ or 72″ side panels). Since a standard melamine board comes in 96″ length, you can cut one board in half and make two 48″ side panels. (Tip – get the big box store to cut them for you if you don’t have a saw). You can also make several shelves from a single melamine board. Also, don’t overlook left over or discarded melamine sections that you already have. Part of my shelves came from an old shelf that I had removed from my garage.
Just for price comparison, the melamine boards that I purchased came from Lowe’s. They were 15″ x 97″ and 3/4″ thick. They cost $19 each. One board can make two 48″ side panels. If I bought a set of premade closet panels of the same length, it would cost around $55, give or take a dollar for brand choice. That’s a significant difference just to get a brand name and a few holes. (FYI – the $19 melamine boards also come with shelf holes predrilled for a cost of $27. So, if you don’t want to drill your own holes, you could still get a decent savings from buying the boards located in the wood section of the store).
Easy DIY Closet System – Preparing the Panels…
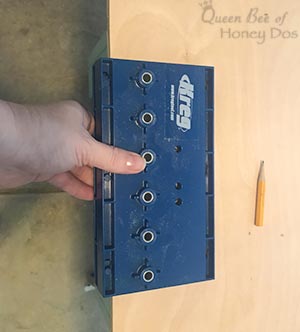
To get the melamine panels ready for use, you will first need to cut them to length. (or have the store do this for you). Then, you will need to drill shelf pin holes in each panel. I use my Kreg Shelf Pin Jig* to do that. It is a super easy DIY skill to have, and is necessary if you want to have adjustable shelves. (Image above of me putting pin holes in my laundry cabinets – coming soon!)
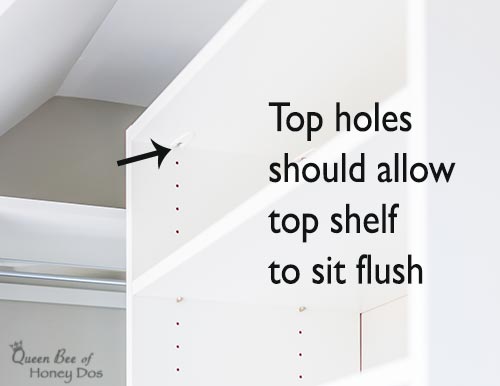
To begin your shelf pin holes, determine the thickness of your boards and start with the first hole the same amount below the top edge. This will allow a shelf to flush sit at the very top of the panels. Also, the front row of pin holes should be at least 12″ away from the back edge of the panel. The back row of holes can be placed wherever you like, but I recommend just letting the jig determine the location. You can see more about how to use a shelf pin jig, here.
Easy DIY Closet System – Hanging the Panels…

To hang the panels, place the first side panel against the wall where you would like to begin. 48″ panels should be places at least 42″ above the floor when using double rods. (You can find more information on correct closet measurement guidelines, here). Attach them to the wall with 3″ wood screws. Try to set the screws through the stud along the back of the wall, and if possible, try to find another stud along the front edge. If studs can’t be located, be sure to use sheetrock anchors or toggle bolts.
Continue with the second panel. Use a level to place the second 48″ panel on the adjacent wall. Continue to place panels on each wall where you wish to hang clothes or place shelving.
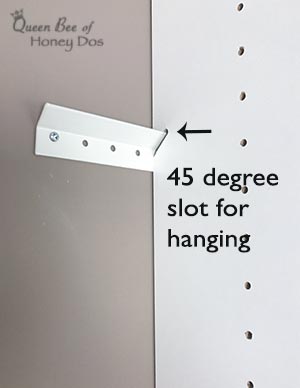
If you wish to have a dividing panel between the wall panels, you can do this very easily by using an angled closet rail. Typically, the kits come with this rail which allows the systems to hang on the wall. Well, you can buy these rails and cut your own slots. On my closet, I used the Martha Stewart rail* and cut a 45 degree angle into the board that I needed to hang. There is also a similar rail made by Easy Track.* You can use the links provided to purchase from Amazon, or if you prefer you can shop at your big box store. The Martha Stewart rail is available from Home Depot, and the Easy Track rail can be found through Lowe’s.
Easy DIY Closet System – Corner Shelves…
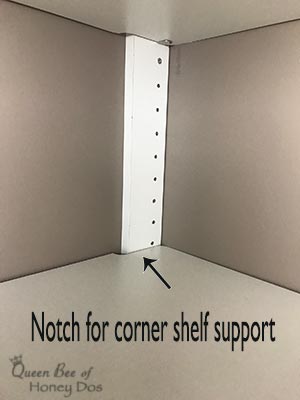
Shelving units made from the same 15″ boards is the most budget friendly, and also the easiest to install. However, some people like their corner shelves to wrap around the corner. If you choose to use wrap around corner shelving, you will need to provide not only a panel on each side, but also a support along the back. I used some scrap melamine to provide a shelf pin support for my corner shelves. To do this, you treat the support exactly the same as a panel. Simple drill the pin holes the same way and mount the support along one side of the corner. Make sure that it is level with the rest of the panels. Then, notch out the back of the shelves so that they fit around the support.
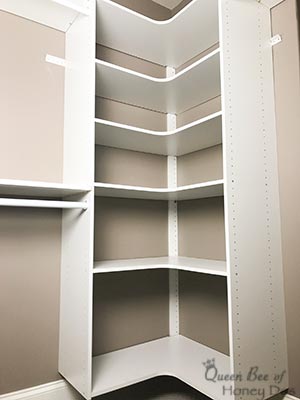
I will note that to use a wrap around shelf, as I did above, you will likely need to buy a set of those shelves, which isn’t cheap. However, it is still cheaper than the kits that come with them. The sets that work best with 15″ wide panel is either the Martha Stewart corner shelves* or the Easy Track shelves.* They come in sets of three and measure 14″ deep. So, they will have a set back of around an inch or so.
Once you have all of your panels in place, you can begin to add your rods and/or shelves. I used these rods* for my closet. They attach right into a shelf pin hole and expand up 48″. I also added shelves (cut to the proper size) to the very top of my panels. This gives it a finished look and provides storage space above the clothes.
Final Comments…
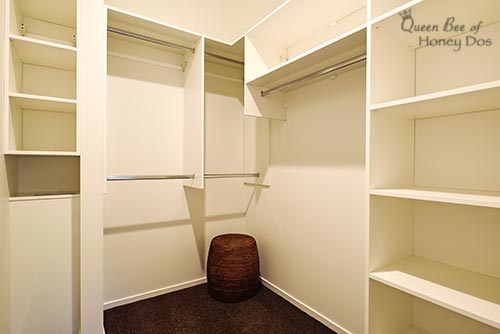
In the image above, you can see how the side panels have been cut to different lengths based on their intended use. If you plan carefully, you can make the most of a single board and reduce your cost significantly. From here, you can embellish and add to your easy DIY closet system as you see fit. I will probably add a few drawers to mine later on. For that, you can either buy stock drawers made from melamine, or you can add wire drawers. To see more ideas for closets, you can read my post on small closets, or you can check out my post on sloped ceiling closets.

– PIN IT –
– PIN IT –


Cin says
Well done! This looks like it would maximize space very efficiently and keep thing tidy and organized :)
Rachel Lynn says
Thanks Cin. It seems to be working well for me. Now I can hang seasonal clothes AND still have shelving for my gear.
Beth says
How far down did you cut the 45 degree slot to use the closet rails? I like the idea of using the rail and keeping the side supports off the floor. What tool did you use to make sure the slots were exactly the same for each vertical piece?
The closet I’m building will be almost all shelves and I’d rather not pay extra just to have someone have cut a slit.
Thanks!
Rachel Lynn says
Hi Beth,
I used a router with a straight bit for my cuts. I used the hanger to trace the angle on the panel as a visual to make sure that I was cutting that first piece correctly. Next, raised the panel off the surface of my workbench with 2x4s and clamped a straight edge to the panel to guide my router along the mark. Then, used the first piece to mark for each consecutive piece. If you don’t have a router, you can use a coping saw to cut those slits. Takes a bit more effort but still easy and much cheaper.
Rachel Lynn says
Oh, the slots are approximately 9″ from the top of the panel to the starting point of the cut.