Welcome back for another round of this dining/office makeover! This week, I am showing you how to make these super easy, custom drop cloth curtains. Yes! I said, “drop cloth.” These bad boys cost me a whopping $28! Isn’t it amazing that you can get drapes that look like they were tailor-made for your windows at such a low price?
Just to refresh your memory, or to enlighten those who haven’t been following along with this makeover, I am a participant in the One Room Challenge in partnership with Better Homes and Gardens.
This is a biannual event that showcases a collection of designers and renovators. Each participant has six weeks to complete a single room makeover or renovation. Each week, a new part of the process is revealed to viewers.
The idea is for the participants to be able to come together, share ideas, and provide professional support for one other. We are not in competition with each other; however, the amazingly creative designs that are delivered by others certainly encourages one to strive for their best.
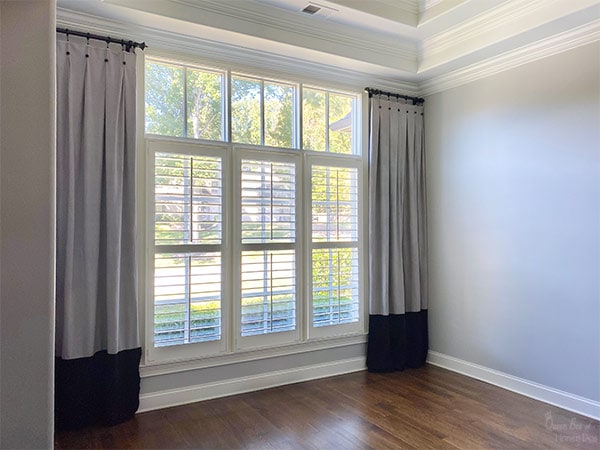
This is week four of the challenge, and as my project for this week, I have created some custom made drop cloth curtains. The best part is that they are super easy to recreate, and they won’t cost you an arm and a leg!
(This post may contain affiliate links (*). That means that I make a small commission from sales that result through these links, at no additional cost to you. You can read my full disclosure here.)
Materials Used for Drop Cloth Curtains
Drop Cloth Drapes
Items Used for this Project
Drop Cloth Tarp Art Supplies* - 6x9 Finished Size
100% Cotton, Seams Only On The Edges, New Unmarked Fabric, Cotton Duck Fabric
allen + roth 2-Pack Espresso Bracket*
Set of 12 Wire Eye Back Upholstery Buttons*
Which Drop Clothes to Buy?
So, where to begin? I suppose at the beginning would be nice. That leads me to the drop cloth options that are available.
You can purchase them just about anywhere. However, I found that many brands have flaws that you may want to avoid. My biggest pet peeve
Because drop cloths come in such large sections, many manufacturers sew cut-offs together into one canvas. You don’t want to get a drop cloth that has a seam down the center.
The ones that I used are advertised to be seam-free. So, I decided to give these a try. They turned out to be quite decent in quality for a drop cloth.
Prepping The Drop Cloths:
While we are discussing the quality, I do want to point out that you will probably want to wash the drop cloths before using them. Be forewarned! They can and will shrink in the dryer.
I ordered 6×9 drop cloths for my windows and ended up with drapes that measured closer to 5×8. However, I ran mine through the washing machine and the dryer a few times.
What I should have done was to allow the drop cloths to line dry. But, you live and you learn. Luckily, I already planned to add panels to the bottom of these because my ceiling is 10 feet high. So, it wasn’t really an issue for me.
Just be aware of the potential of shrinkage. Then, you can purchase yours accordingly. i.e Always buy bigger than you think you will need unless you plan to compensate with
Pleat Options for Drop Cloth Curtains
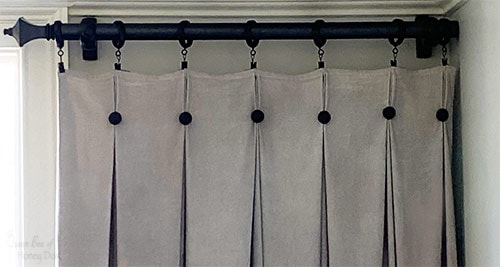
There are several styles of pleats that can be done on drop cloth curtains. My favorite is the pinched pleat, but there are so many options. Other styles include the relaxed pleat, the inverted pleat, and every combination of those that you can come up with.
Fortunately, none of these are difficult to create. Most just require different locations for stitching to vary the design. For instance, a three-fold pleat can be made into pinch pleats by placing a tack stitch approximately 3 1/2″ down from the top.
If the stitch is placed along the top, the result is a relaxed pleat. For an easy variation, the pleats can be reduced from three folds to just two folds. Then, there are accessories that can be added. The options are endless.
Making Pleats in Drop Cloth Curtains
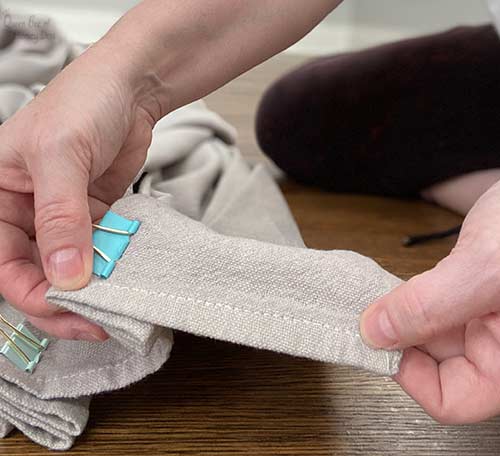
Step 1 – To make the pleats on my drapes, I start from the front edge that will hang next to the window. Then, measure out 5″ of fabric. This will be free of any pleats and can be used to add trim if that is desired.
Step 2 – Start the first pleat 5″ in. Make three equally sized folds. I am doing mine 1 1/2″ deep. However, they can be made smaller to keep the curtains as wide as possible.
Step 3 – Make sure that each fold is gathered straight and evenly for at least 4″ from the top seam. This will prevent the folds from looking wonky once it is hanging.
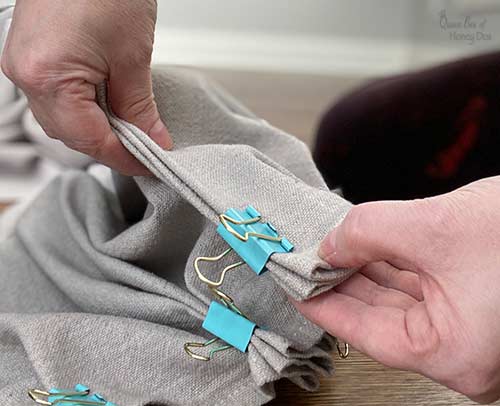
Step 4 – Next, use a binder clip to hold the pleat in place until you are ready to start your tack stitches. This allows you to go back and make adju
Step 5 – Continue by repeating the steps above for all the remaining pleats. There should be 5″ between each pleat when they are folded away from each other.
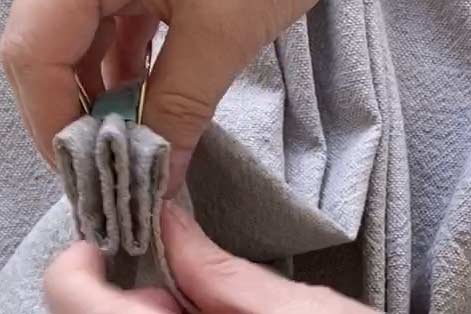
Step 6 – After all the pleats are clipped in place, start adding your tack stitch. I like to stitch the back of the folds together regardless of my pleat style preference. If you want a relaxed pleat, you can stop at this point.
Step 7 – For a pinch pleat, measure 3 1/2″ down from the top of the pleat. Then,
Attaching Accessories
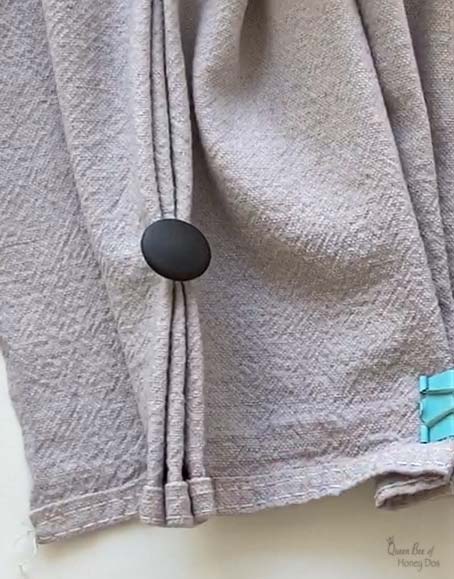
Instead of tacking the pinch pleat, I added an upholstery button before sewing the pleat in place. I slid the shank between the pleat and sewed it in place. As shown above, the drop cloth curtains have a standard pinch pleat.
Step 9 – (optional) However, I decided that I like a bit more of a formal look that I can get when I tack the top-front together. So, I added an additional stitch there. This closes the top of the pleat and takes away the relaxed look that normally is seen in a pinched pleat.
Cheap Rods
I really needed to reduce the budget for this room so that I could save as much as possible for the decor phase. So, rather go out and purchase a couple of rods and finials for these, I used some leftover dowel rods and confiscated two finials from an old out-dated rod that I had in my attic.
I painted everything black and then, drilled a hole in one end of the dowel rod. After that, I attached a finial to one end of each dowel. Since I wanted my curtains to extend all the way to the wall, I didn’t want a finial on both ends.
The dowels are 1 1/4″ in diameter. The only hardware that I had to purchase were the hangers and the clips to mount and hang everything.
I love using dowel rods in projects because they are so versatile. They are also generally cheaper than purchasing an actual rod, and they come in a lot of differe
Hanging Pleats Correctly
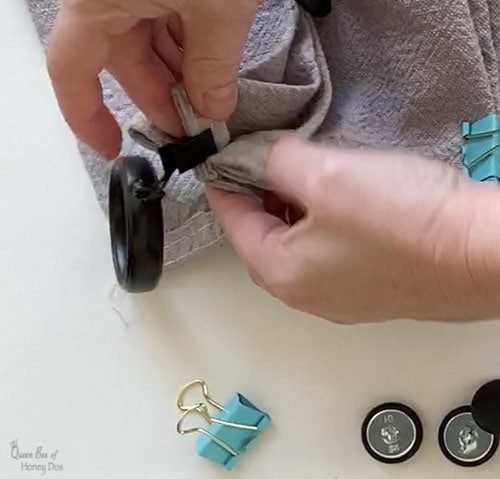
The best way to attach the clips is to separate the top layers of the pleat and clip it to the inner folds. This will recess the clips away from the front of the drop cloth curtains. Which will make them look more authentic.
Additionally, if you try to catch the entire pleat within the clip’s teeth, it will likely break. At the very least, it will cause the clip to die an untimely death.
About Dying Drop Cloth Curtains
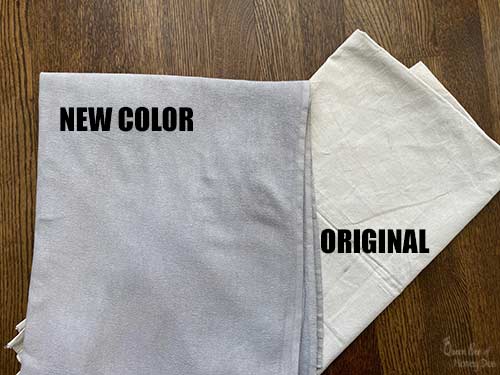
As you can probably tell by the images above, my drop cloth curtains are gray. Obviously, they didn’t come this way. However, the original color is a nice neutral as is. But, if you want to do a really custom job, do a dye job on the drop cloth before you start making your pleats.
I have seen several dip-dyed curtains out on the web thanks to that crafty Martha Stewart woman. ? I considered doing something like that but ended up preferring something more sophisticated looking.
I decided on Pearl Gray dye. I didn’t want my curtains to come out very intense but instead was going for something subtle. So, I just used one bottle.
I have to say that it is not a quick and easy dye job when the fabric is this large. I did these once in my front load washer and that didn’t work too well. I mention this because you may want to avoid this method, especially if your machine is incredibly stingy with the water supply.
My first round with the machine came out blotchy. Mind you, I have been doing dye jobs since my early teens, and I am well aware of all the quirks and bugaboos that these dyes can have.
However, I have been having a love-hate relationship with these high-efficiency machines for quite a while now, and as a result, I am blaming them for
So, I am editing out the steps that ended in less-than-perfect results. What is left is the process that I used to get these drop cloths dyed to an even-colored silver gray. FYI – this color works perfectly for a
Step 1: Wash the drop cloths in your machine as usual. Use a double portion of bleach to help remove some of the
Step 2: Fill a large tub or sink with enough water to allow the drop cloths to freely move. I used my bathtub, which required a thorough cleaning after the fact. Buckets may not be large enough for both drop cloths to achieve even coloring. (FYI – use your hottest water!)
Step 3: Pour one bottle of Pearl Gray dye into a mixing container and add a minimum of 4 cups of the hottest water that you have. Mix well.
Step 4: Pour the dye mixture into the tub or sink and mix with a paint stick. If you want a really saturated color, add 1 cup of salt to the water and mix well. Make sure that everything is completely dissolved before moving forward.
Step 5: Take the still wet drop cloths from the washer after the final spin. Shake loose the folds as well as possible and lay the fabric into the dye mixture. Repeat for the second drop cloth.
Step 6: Using the paint stick (or your hands if wearing gloves), fully submerge the drop cloths. Allow the fabric to absorb for no more than 5-minute intervals. Between each interval, readjust the fabric to ensure even absorption.
Step 7: Once the color looks ideal, transport the drop cloths back to your machine using a 5-gallon bucket. Turn the machine to the drain/spin cycle. NOTE – do not rinse the fabric at this point.
Step 8: After the fabric finishes the spin cycle, examine both drop cloths. If one is not as dark as the other, you can return the lighter cloth to the dye mixture for 10-15 minutes. I ended up soaking one of mine for an extra 30 minutes because it seemed more resistant than the other.
Step 9: After both drop cloths have reached a consistent color that you like, place them in the machine for a final rinse and spin. Then, allow to line/air dry. Optional – you can use your dryer on a no
Step 10: After drying, iron the wrinkles out of the drop cloths. Use steam if you have it. Allow
What to Do If You Hate the Dye Job?
If your drop cloths turn out a color that you can’t live with, or if you botch the job, you can run them through your machine with 1/2 cup of bleach and it will remove the coloring. Just keep in mind that the fabric will likely return to a lighter shade than the original beige color.
If you want to go for an off-white shade, you can allow the fabric to soak for additional time in the bleach solution. I have never been able to get these drop cloths to bleach to completely white, but they do lighten up to a soft beige tone.
Final Comments
I am quite pleased with how these turned out. While it wasn’t as simple as j
If you missed the other projects included in this room makeover, be sure to check those out below. See ya next week for the next DIY in this renovation!
Week One – The Plan!
Week Two – A Neutral Canvas in Repose Gray
Week Three – Chevron Plank Ceiling Feature
Week Four – YOU ARE HERE!
Week Five – Drum Chandelier Makeover
Week Six – Home Office Reveal


Jennifer Bell says
The BEST drop cloth drapery project I’ve seen to date! I love the more “put together” look of your pleats. I’m going to try to find the seam free drop cloths now. Wish me luck!