Being that I have hardwood flooring throughout my entire house, I tend to stock up on rugs. I have rugs of all types and colors. I change them out the way most people change their throw pillows. But, having so many rugs can be costly when it comes time to get them cleaned. Luckily, I have a very effective DIY professional rug cleaning method!
(This post may contain affiliate links (*). That means that I make a small commission from sales that result through these links, at no additional cost to you. You can read my full disclosure here.)
DIY Professional Rug Cleaning
If you have read through some of my other articles on cleaning, you have probably noticed that I devoted a lot of space on this site to flooring. I guess that is because I have spent so many years trying out different brands and cleaning methods, it has given me a lot to talk about. Yes, I like to shop for rugs, but I expect those rugs to last.
And, as I have mentioned many times before, I have both children and dogs. I always have and probably always will. Like most of you, I assume that my children will one day be replaced by grandchildren, and although I don’t like to think about it, I imagine my two fur babies will leave and be replaced with another fur baby. (Well, not exactly replaced. They could never be replaced, but I am sure you understand what I am getting at).
Anyway, having either of those two things in a house means that your floors will be subjected to regular torture. That also means that in order to keep up, you will need to do some regular maintenance. Cleaning wood flooring doesn’t take much effort. But for rugs, that maintenance comes in the form of deep cleaning, especially when you are trying to keep a clean house with dogs living in it.
Why it is important to do regular cleanings…
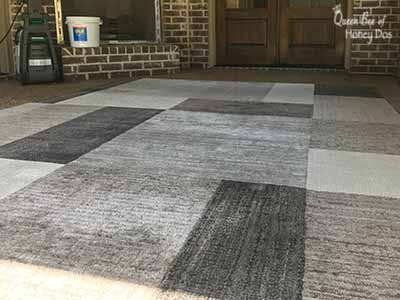
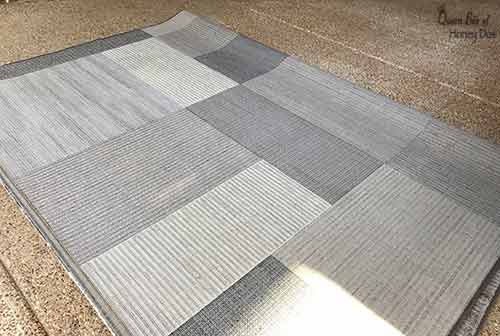
It is vital to the longevity of a rug for it to be cleaned properly. Even with regular vacuuming, rugs collect grit, allergens, pet dander, and all sorts of gross debris. It settles way down in the fiber where even the best vacuum can’t completely lift. This is the before (above) of my rug. It is in pretty good shape, but it looks a little dull from all of the traffic and dirt that has settled over the past year.
Then there are the wet stains to worry about. Your rugs probably suffer from occasional spills, and if you have pets, possibly even accidents. Even the best pet proof rugs need some attention to deal with issues.
In addition to the things mentioned above, rugs also tend to hold onto odors. That’s odors from cooking, odors from stinky feet, and odors from your pets. If nothing else, a good cleaning will remove these odors and help to freshen the air.
It is important to do regular cleanings because all of these things accumulate over time and cause the fibers to deteriorate. Even when you can’t see it, it is happening. The good news is we can remove all of that grime and odor the same way that we would for our other fabric items – by washing them.
Now, I am not talking about just running a carpet cleaner over the floor. Although, that is definitely a great way to do a light spring cleaning and may need to be done occasionally. What I am talking about is a deep down, back-to-new, purge that can only come from a professional cleaning.
Why I choose to DIY my rugs…
(Full video tutorial available on my YouTube channel)
I have been doing my own DIY professional rug cleaning for over 5 years now, and I have been thrilled with the results. Before, I would use a rug doctor twice a year and send my rugs out for a professional cleaning every 5th year. This worked okay for me and kept my rugs looking relatively clean. However, it was a bit costly.
I would spend about $200 per rug for professional cleaning. Since I have six rooms with full-sized rugs, that meant that I was spending $1200 each time. Then, I have the extra rugs that I keep on hand for when I want a change. As you can imagine, I was very motivated to try to find a way to do this myself.
Types of rugs that are safe to DIY…
Before we get into the actual process, I do want you to take a few moments to make sure that your rug is safe to clean. As with anything, you should always perform a test spot of any cleaning solution that you plan to use. If you want to try this method, and you are feeling a bit apprehensive, first try it out on a small, inexpensive rug that you are comfortable taking a chance with.
Now, the types of rugs that I have done this type of cleaning on are mostly synthetic interior rugs. You can tell if your rug is synthetic by looking for the tag located on the bottom of one of the corners of your rug. Common synthetic rug materials are polypropylene, olefin, nylon, and polyester. If your tags state that your rug is made up of one or more of these materials, then it is synthetic.
If you can’t find a tag on your rug, I recommend using your own judgment. If you can clean it with rented cleaner, you are probably safe. (Although, you should not rely on my opinion as I can not properly assess something that I haven’t seen). If it is an indoor/outdoor rug, or if you purchased it at Home Depot, Lowes, Wayfair, or one of the other well-known brand stores, it is likely synthetic and safe to clean. Use your best judgment.
Avoid DIYing these types of rugs…
I can not recommend DIY cleaning any type of wool rug. I will leave it up to you to decide if you want to risk it. However, you should know that some wool rugs have jute backing that can release a natural colorant which may cause staining. You can read more about the differences in backing materials in my article on pet proof rugs.
Persian rugs should always go to a professional for cleaning. They are what I think of as the hot-house orchids of the rug world. According to the DIY Network, you should only perform spot cleaning on them.
I also would avoid any type of rug that will cause an issue with extracting the water. Some types that come to mind are shag rugs or those rugs that are comprised of long threads. Getting your rug dry in a timely fashion is extremely important.
You should avoid any rug that is already in bad structural condition. If the backing is cracked and worn or if the rug is showing signs of deterioration, they may not hold up to this process. If in doubt, don’t take the chance unless you are okay with the possibility of having to replace it.
In addition, if it is a family heirloom or you would be hear-broken if the rug were damaged, I recommend that you leave it to the professionals.
Prepping to do a DIY Professional Rug Cleaning…
Okay. Now that we have gotten past making the decision for or against cleaning your rug, let’s move on to getting ready to actually do the cleaning. There are a few important steps to take before you start blasting away. But, don’t worry. It’s nothing too elaborate.
- First, you want to start with removing as much of the loose dirt as possible. I just do a thorough vacuuming on mine. This will help to cut down on the number of times that you need to go over the rinsing process. You will get a better idea of what I mean after you read through the entire process.
- Next, you need to clean the area that you will be using to wash your rug. I pressure washed my patio the day before I did my rug cleaning. Then I went over it with a quick rinse the day of just to remove any pollen or dust that had blown in during the night. You don’t want to start cleaning a rug on a surface that has its own layer of dirt.
Materials Needed…
So we have gone over types of rugs and getting everything ready, but we haven’t yet addressed what you will need. For the most part, you should only need a few items. But, I want to go over a few special issues and what you can do to address these. (Remember – always do a patch test before using any of the chemicals mentioned below).
Tools:
As you can see in the video, I used a pressure washer and a cleaning machine. You can use any pressure washer that you like, but if it does not have a way to adjust the amount of pressure, make sure that you start about 18″ away from the surface of your rug. Then, ease in closer to get the right amount of pressure to clean without damaging.
If your pressure washer does have the adjustment option, start at your lowest setting. Then, gradually increase the pressure and distance until you find a comfortable setting that is getting results. The idea is to just apply enough pressure to force the water down into the fibers and dissolve the soil. We are not trying to dislodge the threads. ?
If you don’t have a pressure washer, you can do this with a jet spray nozzle attached to your water hose. Because you will be doing a lot of spraying, I recommend getting one that doesn’t require you to squeeze to trigger the water. I like this high-pressure nozzle* because it uses a twist action to increase pressure. All you do is turn it to the setting you want and you’re all set. It leaves your hand free to do other things and you don’t have to worry about hand cramps.
Next, you will need a water-extracting machine. If you don’t have your own machine or you don’t want to purchase one, you can use a rental. I did this with a rental for years, before purchasing my own machine. Regardless, it is very important that you have a way to extract the water.
The machine that I am using is a Bissell Big Green Professional Machine.* If you are looking to purchase a machine that works the same way as those rental machines, this is it. I purchased this one because I was paying around $150 per year in rental fees for a Rug Doctor, and I also don’t like the ick factor that occasionally comes with some of those machines.
Cleaning Solutions:
To create your cleaning solution, you will need a 5-gallon bucket. You can pick up a bucket a Home Depot or Lowes for less than $5, or you can order a good one from Amazon.* You could also use an old pool bucket like I am doing.
The mixture should be around 5 gallons of water to 1 cup of cleanser. I am using Borax as my cleanser because it is good at removing odors and provides a gentle cleaning. However, my rugs get cleaned like this every 1-2 years, so there isn’t a lot of dirt accumulation to worry about. Depending on the degree of strength that you need, you may find that one of the below options is better suited to your situation.
- Standard carpet shampoo* – always a good option if you aren’t sure what to use. I am not a big fan because I don’t like the chemical scent that goes with them, but that may not be an issue for you.
- Homemade solution – If you have a favorite cleaning solution that you know will work on your rug, go for it!
Special Issues:
- Odors – If you have a lot of odor in your rug and you want to address this specifically, try adding 1 cap of this Lysol laundry additive* to your solution. It is designed to remove odors from your clothes but works well on rugs, too. Although I didn’t detail it in the video, I use this each time I clean a rug.
- To create a custom scent – dissolve half a cup of Downey Unstoppables* to a bucket of fresh water and pour on during your final rinse. It will make your house have a fresh clean scent for about a week. I prefer the additive mentioned above, but this is a good alternative if you don’t like the scent of the Lysol additive. (FYI – you can also use Unstoppables to make your own drawer sachets)
[adinserter block=”6″]
Instructions to DIY Professional Rug Cleaning…
Important! Do not skip this part.
Now that we have reached the portion of this post where I lay out the instructions, let me state unequivocally that you must do this on a warm day. I am in Tennessee, so I do my rugs first thing in the spring. However, you may not receive the required temperatures until later in the year, depending on where you live.
The optimum day to do this would be on a sunny day with at least a slight breeze and temperatures at or above 75 degrees. With these conditions, it will take an average of 4 hours for your rug to dry. The time can be less or slightly more depending on the temperature and on the thickness of the rug’s pile. However, since this requires manual labor, it can be an unpleasant experience if you try to do it after the temperature gets above the 90s.
I am pointing out the importance of weather because you must let your rug dry thoroughly before you bring it back inside. This isn’t just a surface cleaning like you would get when using a rug cleaner alone. The rug will be wet all the way down and through the backing.
If you take it back inside before it has dried it will likely sour and possibly even mildew. But, if you allow it time to dry, it will be like a brand new rug. In fact, the sun is a natural disinfectant and bacteria killer. So, let your rugs remain in the sun until completely dry.
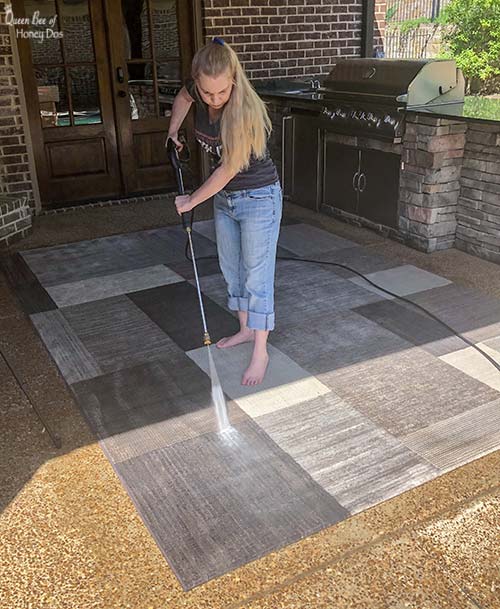
- Lay your freshly vacuumed rug out on a clean surface, preferably in the direct sunlight.
- Begin by wetting the rug thoroughly with your hose or pressure washer.
- Mix 1 cup of Borax and 1 cap of Lysol laundry additive to 5 gallons of water.
- Distribute solution over area of the rug.
- For heavily soiled rugs, a light scrubbing with a scrub brush may be done if needed.
- Use pressure-washer to work the solution into the fibers of the rug and to begin the cleaning process.
- Begin pressure washing from one end of the rug towards the other. Concentrate on moving the dirt in one direction.
- Flip one-half of the rug over onto itself, and pressure-wash the back of the rug. Pay particular attention to stained areas as this is where things have penetrated the fibers the deepest.
- Use the carpet cleaning machine to suction water from the backing.
- Lay rug back out flat and use the carpet cleaning machine to suction the front side that you just cleaned.
- Repeat the 3 previous strep for the opposite side of the rug.
- Begin the rinse cycle by pressure washing from one end of the rug towards the other.
- Use the machine to suction the entire rug. Pay close attention to the water when you stop to empty the machine.
- Repeat the rinse and suction process until the dirty water begins to appear clear. It may take 3-5 rinse cycles to get all of the soil removed from the rug.
- Allow rug to dry completely. To speed the process, halfway through, flip one-half of the rug over onto itself so that the back-side can dry.
I should note that it is unlikely that you will get the dirty water container to be completely clear because it will always be suctioning through dirty hoses and past things that have collected inside the machine. But, you can reach a point where the water has only a tinge of color with no soapy residue.
You should be able to make a good judgment just by comparing the initial dump to the next few rinse cycles. If you reach a point where the water is almost clear but doesn’t seem to be getting any clearer, you have probably reached the limit.
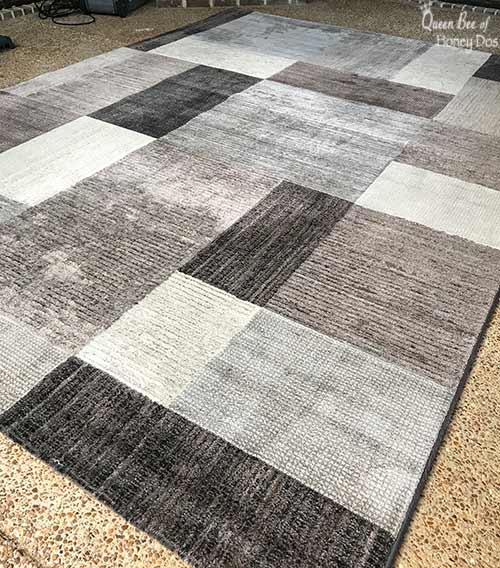
And this is the after view of my rug. I took this shot about 30 minutes after finishing. I didn’t bother with brushing the fibers in one direction because it is still wet and I am not interested in staging for this post. I just want you to see how dry the rug appears when the water has been properly extracted. You can see a few footprints where I walked across the rug, but for the most part, it almost looks dry.
Final Comments…
The way that I keep things in check between deep cleanings is to use my SpotBot on spills and accidents as they happen. I also occasionally will skip a year on deep cleaning and just do a standard rug cleaning with my machine.* But, I never let it go for more than one year.
Once you get the hang of doing your own professional rug cleaning, you will be amazed at the money that you save on shipping them out. You will also be amazed at the amount of dirt that comes out of your rugs. Even if you do regular cleanings with a carpet cleaning machine, you will see a massive difference in the outcome when you do it this way. Happy cleaning! ?

– PIN IT –


Sandra B. says
Wow, thank you for the guide! I have been using a professional rug cleaning service, but like you said it has gotten costly for me. I’m going to give this a try!
K Kuchiya says
Wow Racheal, such an insightful post. You’ve done great in breaking down this process for us. I’m sure following your tips will help me significantly lower my rug cleaning costs.
Rachel Lynn says
Thanks K!
Sarah White says
Thank you so much for this helpful blog post Rachel! I normally just get my rugs cleaned by a local rug cleaner and they always do a good job, but I’d like to try your method next time my rugs need to be cleaned. I do have a wool rug that needs to be cleaned, but you mentioned not to use this method for those types of rugs. Do you have any advice on how to clean wool rugs?
Rachel Lynn says
I would take those to a professional.
Alicia Hursley says
I love getting my annual area rug cleaning which isn’t as costly for me because I only have two lol But I did need to find ways to get them looking professionally
Shelby says
Great tips! Will give this a go in between my professional rug cleaning appointments.