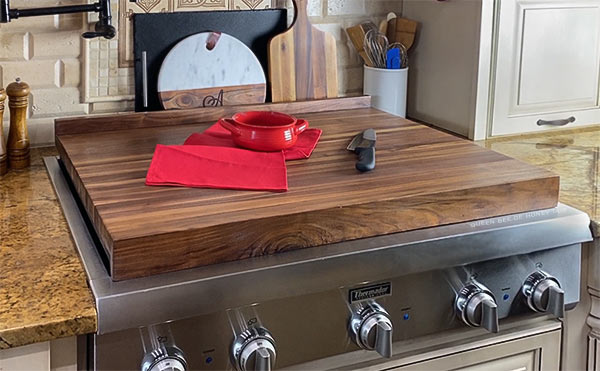
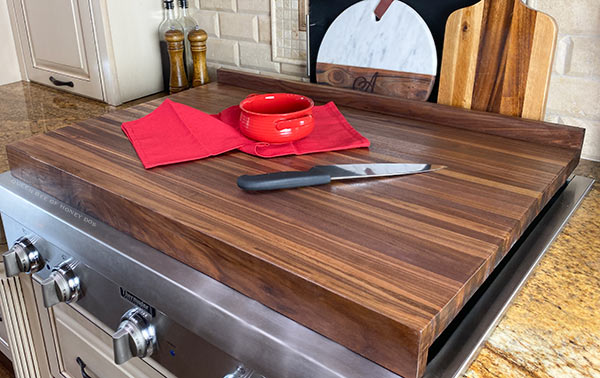
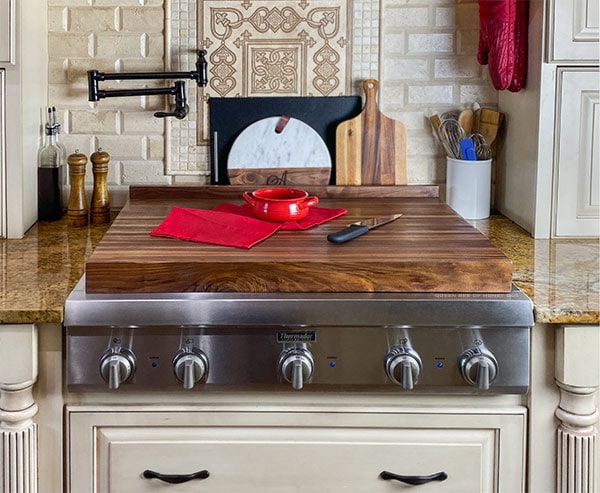
I have been wanting a large pastry board for a while now, and I finally got around to building one. It turned out GORGEOUS! I made mine out of walnut to get those deep beautiful tones. It is double-sided, which means I can flip it over and use the other side as a cutting board.
I also built it to the exact size of my range cooktop. This means it serves as a stovetop cover.
But the biggest bonus is that I have extended my kitchen work surface by almost three feet.
Oh, and did I forget to mention that it makes an AMAZING charcuterie board.

Best Wood to Use
Before we get into the plans, I want to quickly go over wood options.
My preferred choices of wood are walnut and maple. You can see more about what types of wood to use in my guide for choosing cutting boards.
Because this is a pastry board, I highly recommend that you do not use any open grain wood species such as oak. It tends to catch the dough, and flour will settle into the grain.
Parts of Wood (Terminology)
You can make a cutting board with any wood surface exposed. This pastry board was built with an edge grain.
I prefer edge grain for this type of project because edge grain boards work well for both pastry making and for chopping.
While face grain boards are a good option for pastry making, they will show every single knife mark.
End grains are better for knives but are not the best option for pastry making. Over time, end grains will snag on the pastry dough. They require more frequent sanding to keep this in check.
Since this board is reversible, I will be using one side for pastries and the other side for light cutting/charcuterie.
And now the instructions!
Ripping the Wood
I started by cutting my planks down to about 6” longer than I wanted the final board to be. This allows for plenty of room to trim the board after assembly.
Next, I set my table saw to a 1.5” and ripped the boards down to this width. You can go as low as 3/4” thick all the way up to 2” wide.
Keep in mind that narrower strips will give you a lighter board. Wider strips will give you a longer-lasting board, but it will also be heavier to move around.
Since my planks were 3/4” thick, I needed 30 pieces to get a work surface of 22.5” deep. Adding a lip and a backsplash to the board brought it to 24” deep.
TIP – A typical countertop is 24” deep, but stovetops can vary. I recommend that you measure the area that you want the board to cover and calculate your cuts accordingly.
The glue that I use for cutting boards is Titebond III. It is waterproof and considered safe for this type of food contact.
If you decide to use a different glue, just make sure that it is approved as a food safe glue.
Flattening a Cutting Board
The normal process used by carpenters to flattening a board is to run it through a benchtop planer. However, there are other ways to get the job done.
Since I have received so many requests about how to flatten cutting boards without a benchtop planer, I decided to demonstrate that with this project.
I completely understand that the average DIYer and beginning woodworker does not have access to expensive tools like a planer. But folks, you really don’t need one unless you plan to make these to sell.
Although it takes a bit more time, patience, and precision to get a board flat, you can do it with several tools that are much cheaper than a benchtop planer. I finished this pastry board using a belt sander and a random orbital sander.
If you are going the same route as I did, I recommend that you plan to space the finishing process out over a few days to give your arms a break. Take your time and don’t try to force the process.
Two to three days is an acceptable amount of time to get a lovely item that can be cherished for a lifetime. Just pace yourself so that you get a good flat surface. Slow and good is much better than fast and sloppy.
To see other options for flattening wood, check out my post on that topic.
There is no need to apply downward force on a belt sander. Just give it enough pressure to maintain the belt at level and parallel to the wood. As long as it isn’t bouncing across the surface, it will do the work for you.
Repeat the process by doing additional 45-degree passes. Turn the sander so that the second 45-degree pass is 90 degrees from the first pass. This will provide the most level results.
NOTE – Make sure your board is clamped down when using a belt sander. Otherwise, your board could end up flying across the room. Well, maybe not that extreme, but it will definitely shift it around.
You can usually tell if you have reached a “rough” flat point by checking out the individual wood strips. If any areas lack sanding marks (see image above), you need to keep sanding.
You can also use a straight edge set against a lit background. If the light shines through any spots between the wood and the straight edge, it isn’t level.
It is common for beginners to want to move with the grain. They also tend to focus on the individual strips, trying to get the sand marks out in one fell swoop.
What they end up doing is creating more dips in the board and undoing all the flattening they worked so hard to get. This is why I recommend moving across the grain.
Focus on keeping the pressure even and keep it moving in a constant motion. Don’t focus on any one area for too long.
Step 4
After the marks made by the belt sander have been eliminated, begin to step down through your finer grit papers. Make sure to continue with the constant even pressure working across the grain.
I went from 80 to 120. Then finished with a 320 grit. Each step will further refine the results.
The 320 grit is probably not necessary, but I love the silky finish that it produces.
After the wood dries, sand again with the 320 grit. Repeat one to two more times to really work down any grain that might lift later on.
More great projects from my kitchen!
Add a dish drawer insert to keep your dishware organized!
Build a knife block with (or without) a cutting board holder. Fits on counter or use to convert a spice drawer.
Convert your base cabinets to stainless pull-out drawers!
Trimming the ends
After the board was flat and smooth, I used my circular saw to straighten up the sides.
I was careful to remove just enough to get my board to fit the exact dimensions of my cooktop. If you are building one to fit your cooktop, you will want to make your cuts accordingly.
I sometimes use my table saw to do the ends, but this board is quite large. So, I felt the table saw would have been too unwieldy for this part.
Regardless of how you trim the ends, it is best to do the trimming after all the sanding is complete.
I do it this way because the flattening process, whether it is done with an expensive benchtop planer or cheap belt sander, tends to bite into the ends of the board.
The stops and backsplash are added to the board after sanding and trimming. This makes it easier to flatten the board and trim the edges without having to maneuver around these lips.
I cut my stops/backsplash just 1/8″ longer than my finished board. This gives a tiny amount of play during glue-up but doesn’t leave too much to sand off.
NOTE – The width of the strip was determined by the height of the grates on my stovetop. I recommend placing the board on the cooktop and doing a test fit before moving onto the glue-up for this step.
At this time, you can add a juice groove or any customization that you want.
I apply oil/wax very heavily and allow it to soak in overnight. The next day, I wipe away any excess and examine the results.
If I notice any spots that appear dry, I wipe the board down and repeat the oiling process. Repeat this until the wood no longer absorbs the oil.
TIP – I usually wipe another light coating over the board after every few uses during the first few months. Then, do maintenance as needed.

Final Comments

My board fits perfectly over my stovetop and provides an additional solid surface area. I like to use this space to layout my charcuteries or when I serve buffet-style meals.
When needed, I can quickly transfer the board to my countertop. One side is reserved purely for pastry making. When I want to chop some veggies, I fit it over and use the other side.
My family has taken to using it for serving pizza. It provides a nice surface to drop a hot pizza. We just slice it up and leave where it is for self-serving.
Plus, it looks so lovely as a stovetop cover!


Henry says
A Wonderful tutorial! I appreciate the step-by-step instructions presented in plain terms. You seem to actually want to help someone get this done themselves. Some professionals, in my opinion, seem to give instructions that only add to the overall confusion. Especially when working with power tools which is the main deterrent that keep people (me) from even trying most DIY projects. Also, the fact we can see your hair in most shots, shows that it is you working away! I know that that is probably silly, but for me, I thought “look, see, she is doing this! She’s a bad-a**! I can do this!”
Thank you for taking the time make this. A good tutorial is not an easy thing to make, so thank you again. I am off to make some wood decisions… :)
Rachel Lynn says
Henry, thank you for the wonderful comment. I really do enjoy helping people. And it is funny that you mention my hair in the pictures. lol As I am always trying to keep my face out of it. I tend to look quite bad when I work. ;-) (i.e. no makeup, hair in tatters, old ragged clothes). I see some of my other fellow woodworkers and wonder “How do they stay looking so put together during the building process?” But, yeah it is definitely me doing all the work. I grew up very rural and learned at a young age that doing things yourself is not only rewarding but also a vital skill. Best!
Jill says
I love your ideas and your tutorials are so clear and easy to follow. I recently added a butcher block counter to my island and not super happy with the finish. I wanted it to be food save and waterproof. Just wondering if you have a butcher block oil you recommend.
Rachel Lynn says
With wood, there is nothing that is really food safe AND waterproof. Mineral oil is the go-to for a first time seal. It will take a lot of coatings to fully saturate the wood. Once the wood has soaked up as much oil as it can take, I like to do a top coat with beeswax and mineral oil mixture. You can make your own or buy it ready to go. I like both John Boo’s and Howard’s Conditioner.