Door weather stripping is an essential part of a home’s insulation. If you don’t have weather stripping installed on your door, now would be a good time to tackle this easy DIY. Otherwise, you should inspect it every year to see if it’s time for a replacement.
Why Weather Stripping is Important
A properly sealed door will prevent cold air from getting in and warm air from getting out during the winter. Likewise, the opposite is true for the summer months.
Tight weather stripping can also help keep insects and other pests from creeping through small cracks. Around doors and windows is a very popular entry point for bugs.
In addition to what is obvious, weatherproofing your doors can help prevent those cold spots in other parts of the house. Because airflow requires a balance of pressure, blocking one point can help reduce the in-flow/out-flow at another location.
Recommended Materials You May Need
- Kerfed weather stripping* – use this to replace your worn-out stripping.
- Screw-in weather stripping* – use this if your door came sans weather stripping and you want a sturdy and long-lasting installation.
- Caulk* – paintable and flexible to allow movement.
- Utility knife – Always cut rubber and foam stripping with a sharp blade or scissors. Save the saw for the metal and/or wood.
- Foam Spray* – Be sure to use foam spray that is rated for doors and windows like this
- Door Sweep*
- Threshold rubber seal replacement – match size and length of the old seal
Things to Check First
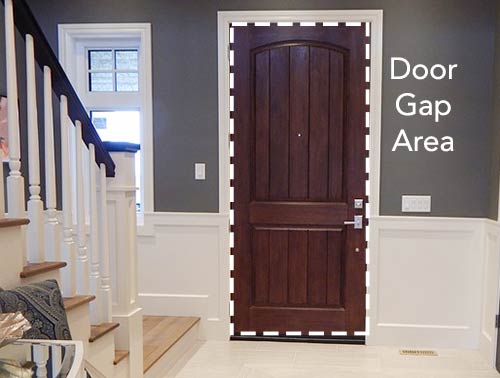
Before getting started with your door stripping, I highly recommend that you first inspect the door gap around your door. The door gap around the perimeter of the door is affected by the hinges – how they were originally installed and how well they have held up over time. Without a proper door gap, it is very difficult to properly seal a door.
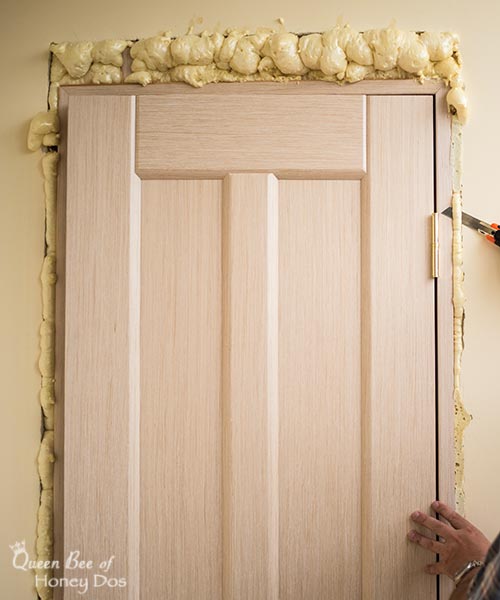
In addition to the gap, many doors lack insulation between the frame and the building structure. It is very common for building contractors to ignore these spots around both doors and windows.
Adding some foam insulation around the door frame will greatly improve the results of your door’s ability to block airflow. Likewise, you can also follow my guide to insulate around your windows.
Door Frame

The first step in proper weather stripping for a door lies with the door frame. All frames should have a well-maintained strip of rubber seal along the top and sides.
Most newer construction doors come with a groove or track recessed behind the doorstop. A kerfed weather stripping tucks into this groove and can be replaced when needed.
Custom-built door frames and many older doors frequently use a screw-in stop/strip combination. These come in both wood and metal versions and mount right over the door jamb.
The built-in weather stripping usually is made of a wrapped foam that is sort of shaped like a V. Some of the screw-in varieties will have a vinyl bulb shape.
If you already have one of these options in place, continue with the below steps to inspect your weather stripping. However, if you do not have one of the above mentioned weather stripping versions, I recommend that you move towards installing them. You may jump down to that section now.
More Great Door Topics For You:
>Got a hole in your door? See how to repair hollow core doors!
>Looking for a door that will fit with your home’s style? Check out this guide to door designs.
>Remove or replace your thumb latch handle set with this guide.
>Easiest way to refresh wooden door finish without taking it off the hinges.
Is it Time to Replace Your Door’s Weather Stripping?
Inspect the weather stripping to see if it has any tears, cracks, or loose sections. Press against it to see if it flexes easily. If it feels crunchy, doesn’t have a good spring back, or if it is staying in its smashed position, it is time for a replacement.
You should also close the door and take a look at the exterior. Check to see if the weather stripping is meeting against the door all the way around the perimeter.
Next, take a look from the inside perimeter of the door. If you see light coming in anywhere around that perimeter, you have a problem that needs to be corrected. Note- light can also be seen if the door gap is not correct. If you passed on the “things to check first” section, I highly recommend you go back and click that link.
How to Replace Worn Out Weather Stripping
The great thing about door weatherstripping is that most of it can be easily removed and replaced. For the kerfed or screw-in tracks, you just need to pull it out of the track. I recommend taking a small section with you to the hardware store to match with the new stripping.
Start at the Top
When reinserting the new stripping, start with the top of the door. Cut your initial length a bit longer than you need. Using a pair of scissors, miter the starting corner to 45 degrees. Slide the weather stripping into its groove. Miter the ending corner at 45 degrees.
I recommend cutting away a little less than you think you should for the corners and gradually removing small slices until it has a nice fit. You can always take away more if needed, but you can’t put it back once it is gone.
Move to the Sides
Next, start with the top corners for the sides. Again, start with a bit more length than you need. Miter the top corner and slide it in place. Work your way down towards the threshold. Cut the bottom straight. It should be flush with the threshold and not have any gaps.
How to Install New Weather Stripping
This portion covers doors that do not already have a kerf or groove set into them. I highly recommend using a nail-in or screw-in weather stripping instead of the peel and stick strips.
It is of higher quality, will last longer, and performs much better. It will also provide you with a kerfed (grooved) track that can easily accept replacement stripping in the future.
Remove the Foam
First things first. You don’t want to cut the wood or metal part the same way you do the wrapped foam. So, remove the foam from the track before making any cuts with the saw. You will make the cuts in the foam with either your scissors or a fresh blade.
Start from the Top
Starting from the top of the door, measure and cut the metal/wood part of the weather stripping to the size needed.
Next, slide the foam back into its track. Then, cut the ends flush with the wood/metal. You can miter the ends for a more professional finish but it is not required.
Move onto the Sides
For the sides of the door, start again by removing the foam strip. Cut the wood/metal to the correct length keeping in mind that you may want to cope or miter the ends.
Test the fit. Once the wood/metal is as it should be, slide the foam strip back in place and miter the top corners. Nail or screw the weather stripping in place.
Threshold
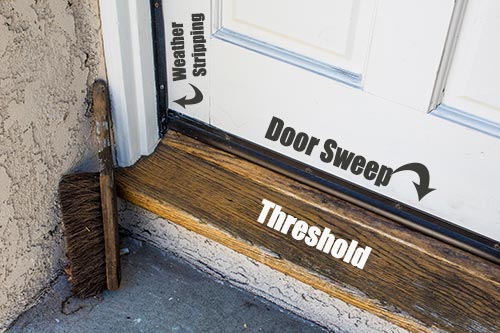
The threshold is a big part of a door’s weather stripping. The typical threshold construction is comprised of a sill plate, a transition, and some sort of rubber seal.
The seal may be just weatherstripping set against the transition. However, thresholds often have a rubber gasket that sets in a track, and/or a door sweep. It doesn’t really matter what type of seal you use on a threshold as long as the seal blocks all airflow.
Adjustable Thresholds
Many thresholds are like my front door (above) and have adjustable screws. This allows you to raise or lower the threshold to get a tighter fit or to reduce any door rubbing. This type of threshold requires a door sweep or a door shoe. Mine uses a door shoe.
Sometimes the screws are located inside the track that holds the rubber gasket/seal. To lift or lower the threshold, remove the rubber seal and tighten the screws.
Replace the rubber seal if it has lost its ability to compress and return to normal or if it has cracks in it.
Door Sweeps
Some doors rely on door sweeps, either in combination with other stripping or alone, as a source of blocking airflow. A door sweep not only blocks air leakage but also can prevent insects from getting inside and can direct rainwater away from the bottom of the door.
Door sweeps can be attached to the face of a door or attached to the bottom of a door (door shoes). These can be used when the threshold does not provide adequate weather sealing.
Consider using door sweeps with thresholds that do not have rubber gaskets or weather stripping along the bottom. A good example of when a door sweep is needed can be seen in the threshold image above (indicating screw locations).
Caulk the Cracks
data-pin-description=”Instructions and tips for installing and replacing weather stripping on your door. #improvement #weatherproofing #doors #repairs #renovations #renos”Finally, inspect the perimeter around the door’s exterior where the door frame meets the building structure. Any gaps that are 1/4” or less should be caulked. Anything larger than 1/4” can be sealed with foam insulation.


Access Doors and Panels says
Thank you very much for sharing this with us. You have a great visualization, and you have excellently presented this content.