If you have been thinking about installing gutter guards on your gutters, let me just tell you that it has been one of the best home improvement things that I have done, yet. If you are worried that it is too difficult a job for you, first read this. You may be surprised at how easy it is to install gutter guards on your own.
(This post may contain affiliate links (*). That means that I make a small commission from sales that result through these links, at no additional cost to you. You can read my full disclosure here.)
I am all about making homes more efficient and beautiful. When it also makes life easier… well, that is always a plus. Back in 2014, I installed gutter guards along the back and north sides of my house.
These sides are surrounded by a lot of trees and I just knew that the leaf litter was going to be a constant job to keep up with. Not relishing cleaning those gutters out twice a year, I decided to get that job taken care of right away.
At that time, I did not do the south side or the front of the house because I wasn’t as concerned about those gutters. Fast forward to today, (FYI – I am in a present battle with a squirrel which helped motivate me) and I have decided to finish the remainder of the house.
This is good for this site because I can now show you how I do these installs. I also can tell you that I have inspected the old guards and am quite pleased.
They still look new, there are no signs of rust, denting, or any other issues. Everything is as it should be and I haven’t had to clean those gutters one time in the past six years. So, onward and upward to get the rest of these gutters finished.
But first, you may want to know exactly why installing gutter guards is a good choice for a home. In which case, I feel it is important to cover all the basics. You can jump ahead to the installation instructions if you want, but I really recommend taking in all the info that comes below.
What are the Benefits of Having Gutter Guards
- Eliminates the need for cleaning – Yes! A big plus and I couldn’t be happier with not having to clean my gutters, which I normally do as part of my summer home maintenance.
- Prevents overflow – Structurally, this is the most important reason to install gutter guards. Overflow caused by clogged gutters can require repairs to your fascia, soffits, roof, and foundation.
- Helps prevent damage from rodents, birds, and other critters – If they can’t get in your gutters they are less likely to gain access to your attic.
- Improves home value – It lets homebuyers see that you have taken the extra effort to maintain your home.
- Improves aesthetics – They provide a finished look to the roof and gutter line. Things just look so much more sleek and clean with them in place.
Issues Not Solved With Gutter Guards
There are inevitably issues that come with gutters that can not be addressed by installing gutter guards. Ice can still build up in some climate zones, although having gutter guards will help prevent that problem.
There are also other irksome issues like pine needles and seed pods. Most guards will not completely eliminate pine needles. For the most part, they should slide over the guard and/or blow away. But, if you have a lot of pine needle deposits on your roof, a few are bound to get stuck.
You should take into consideration your most pressing problem and choose the gutter guard that best addresses those needs. Regardless, having gutter guards will lessen problems and reduce your maintenance.
Which Type of Gutter Guard is The Best
Bottle Brush Guards
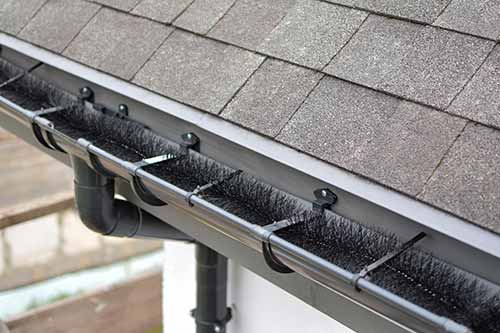
Brush gutter guards* are great if your main concern is birds. It will definitely keep the birds out of your gutters and keep them from accessing your attic via the builder’s gap. However, I don’t find them to be useful for much anything else.
If you have any trees at all, the leaves will get caught up in the brush needles. If you live in an area that sees a lot of icing during the winter, these will compound that issue.
Plastic mesh rolls
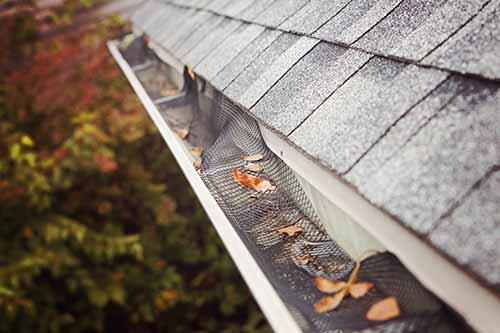
These are the cheapest; however, I do not recommend using them. They are so incredibly flimsy that they will not retain their shape.
They can not withstand any weight from birds or other critters. Even the weight of wet leaves will cause them to sag.
Eventually, they will end up inside your gutter with leaves and debris collecting on top.
PVC/plastic guards
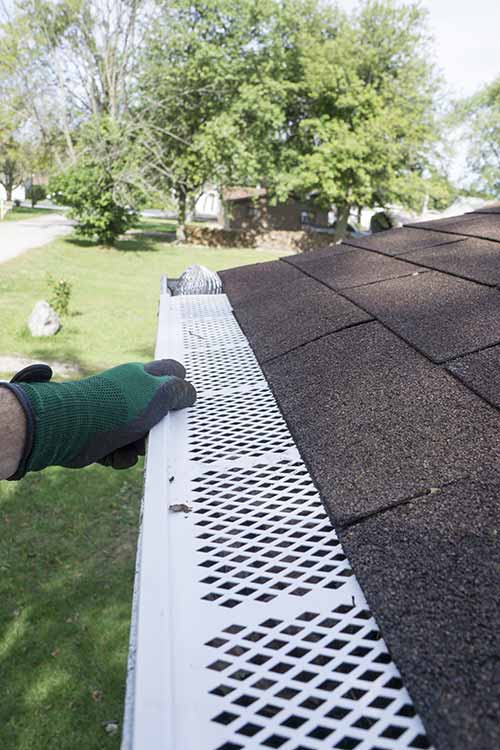
PVC or rigid gutter guards* are a bit stiffer than the mesh rolls, but still flexible enough to make installation easier than the metal versions. However, they are not as sturdy as metal gutter guards.
These work well if you absolutely must have a white gutter guard, but if you have more than a light scattering of leaves, I would pass on these. They tend to bend in the center and over time will cave under the weight of leaves, snow, and critters.
In addition, many of these often come with a fine, mesh, screen covering which is supposed to keep small seeds from washing into the gutters. However, these only work on roofs with almost no slope.
I can’t stress this enough. These will not capture the water runoff if your roof has even a minimal slope. The mesh is so tight that the water flows right over the top of these.
Foam inserts
Foam gutter guards* are probably the easiest to install. Unfortunately, they should be considered temporary at best, and are far from maintenance-free.
What I have found is that the cells in the foam inserts tend to capture dirt, debris, and seeds. If left for more than a full year, seeds will start to sprout and the roots will embed the foam.
Within a short time span, the foam is no longer functioning at full capacity. Unfortunately, you generally will not see any negative effects until damage has already occurred.
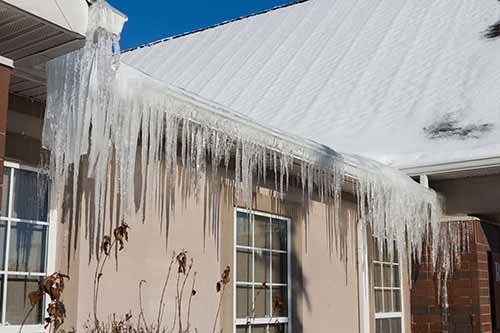
Even more serious issues can arise if using these in cold climate zones. The foam retains enough moisture to allow ice and freezing rain to quickly accumulate. You definitely don’t want to see what can happen when a gutter collapses from the weight of ice.
If you do decide to use foam inserts, you should take them out annually and clean them. Depending on your specific situation, these may require replacement every 3-5 years.
Steel or metal
While these are not difficult to install, they are the most difficult of all the DIY options. Because they are so strong and stiff, they will not flex easily. That means that you will have to exert a bit more effort to install these.
These are also a bit harder on the hands. Cutting these requires special tin snips and you must wear gloves to protect your hands from the metal.
On the plus side, these will hold up for many years. If installed correctly, they will hold their own against the weight of leaves, birds, and other small critters. They do not require any direct maintenance.
However, you may need to wash the grit out of the gutter every few years. As they will not block out sand or roof shingle grit.
Installment angles and Placement:
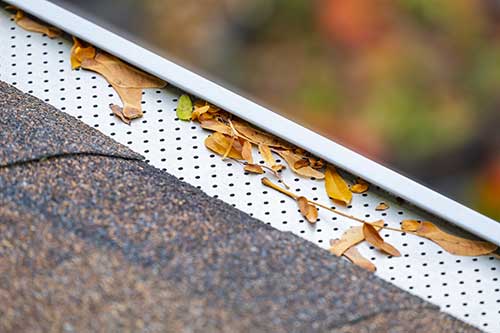
Gutter guards also come in different options for placement. Some lay flat when installed. Some are curved and some maintain the slope of the roof.
The best are those that fit beneath the shingles (what I am installing below) because these will keep the pitch of the roof. This allows leaves to blow over the guards and fall to the ground.
Flat guards (above) are the next best, but in some situations, the leaves can gather on top and require manual removal.
Guards that curve in the center are my least favorite. Depending on how the wind hits the house, leaves can find their way between the wall of the facia and the back of the guards. In most situations, the wind will eventually blow them loose, but it is still something to consider.
Can I Install Gutter Guards On My Own?
Whether or not you can install gutter guards yourself really depends on your roof’s height, your roof’s pitch, your skill level and your willingness to devote the time.
For the most part, gutter guard installation is not a difficult DIY. If you have general handyman skills, you should be just fine. Everything that you need to know can usually be found online, and I am including details below for the gutter guards that I use.
You swill need to be able to make basic 45-degree cuts, understand how to notch around obstacles, and have a general knowledge of how shingles and gutters are attached to a roof.
In addition, you should be comfortable climbing ladders and/or scaffolding. Be aware of the potential for falling and take precautions to keep yourself safe.
Things that can create complicated situations are steep rooflines, second-floor gutters, difficult to reach gutters, and out of the norm roof styles.
How much do Gutter Guards Cost?
Depending on the style of the gutter guards being used, easy to DIY versions will run from between 50 cents per linear foot all the way to several dollars per linear foot. However, a good quality gutter guard will typically run about $1 per linear foot.
How To Install Amerimax Gutter Guards
I personally use Amerimex metal mesh gutter guards.* I find these to be the perfect middle-ground for ease of installation, strength, and best overall performance.
They do not hamper the water flow into the gutters. They do not require any screws but instead lock onto the front lip of the gutter. They maintain the slope of the roof and the design allows leaves to smoothly fall over the edge without getting hung up.
Each piece is 3 feet long and they come in a pack of 25 (75 feet). The cost comes out to less than $1 per foot.
Materials Needed for Installing Gutter Guards:
Other Options to Consider:
Instructions for Installing Amerimax Metal Gutter Guards
The Amerimax gutter guards that I use are installed beneath the shingles and work with up to 6″ gutters. However, I think the performance is better on 4″ and 5″ gutters.
They snap to the front lip of the gutter and have a precut overlap on one end of each piece.

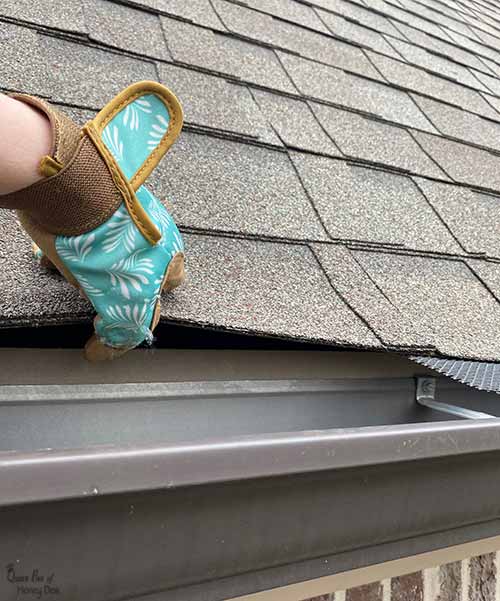
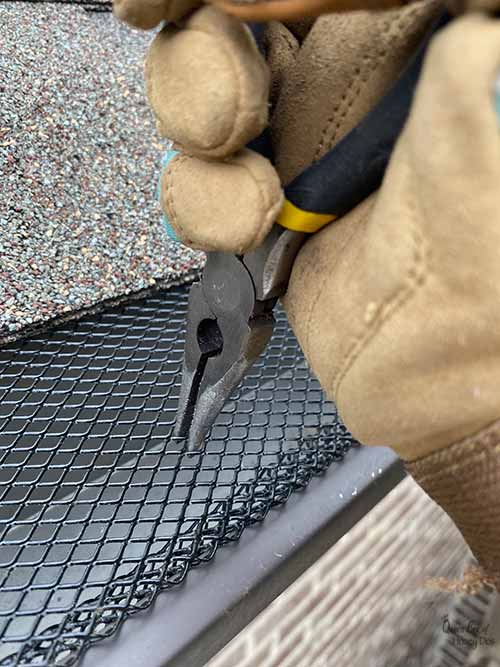
Once the guard is under the shingles, I lift the front snap edge so that it is in line with the front of the gutter and pull forward on the guard until it snaps in place.
Sometimes I find it necessary to use my needle nose pliers to fine tune the placement. Keep a pair nearby because they will come in handy more times than you can imagine.
NOTE – If working during the winter months, take care to not force the shingles in a rough manner. This can result in the shingle cracking or breaking off. They are very brittle when the temperatures drop and much more pliable on warmer days.
Adjacent Gutter Guards:

The next gutter guard will need to overlap the first and each thereafter will overlap the prior one. The purpose of this is to strengthen the ends and to prevent any gaps from forming between the seams.
For convenience, Amerimax gutter guards have already notched out an overlap for you. In most cases, this is enough for adequate strength. But occasionally, you may need or want more of an overlap.
These are easy to make. Just use the Wiss snips and cut away a few inches of the locking edge. This will create a wider overlap.
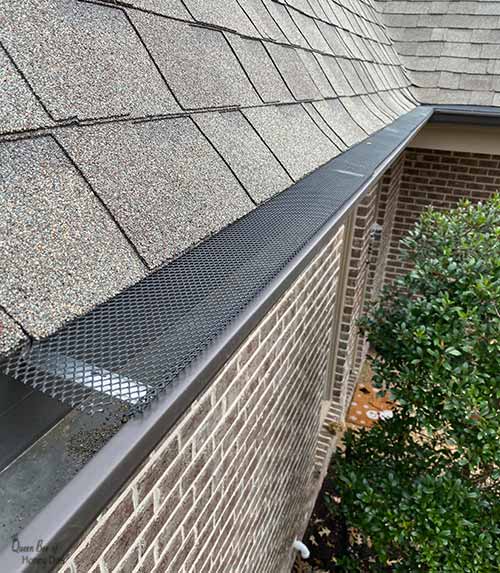
To install the guard so that they overlap each other, place the second gutter guard beneath the shingles. Then, slide it towards the first gutter guard.
As the second guard approaches the end of the first guard, press down on the overlap joint and slide them in place so that the overlap joint is beneath the straight edge of the other guard.
Maneuvering the Corners
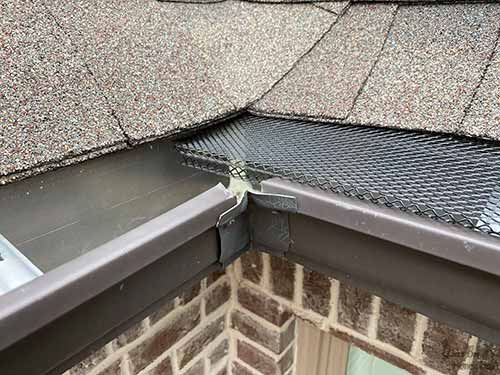
I find it is best to do the interior and outer corners before filling in the space between the two. The two corners will require cutting to make them fit, so it is best to do those spots first.
There are two ways that you can join the corner pieces. One is to cut the corners at 45-degree angles and push the joints flush against each other. If you have a lot of window views of the gutter from above, this will look the most professional.
However, if function is of more importance than looks, creating overlapping joints is the easiest. It is also more secure against critters. I have done both and both work well.
For this house, I am using overlap joints throughout. I find this is the most secure way to prevent those squirrels and roof rats from gaining access to the gutters.
To cut the corners, I just place the first gutter as normal and slide it all the way in towards the corner. Next, I cut the second guards so that it has a larger overlap joint. For outer corners, I slide the overlap under the joining piece, but on the interior corners I place it over the joining section.
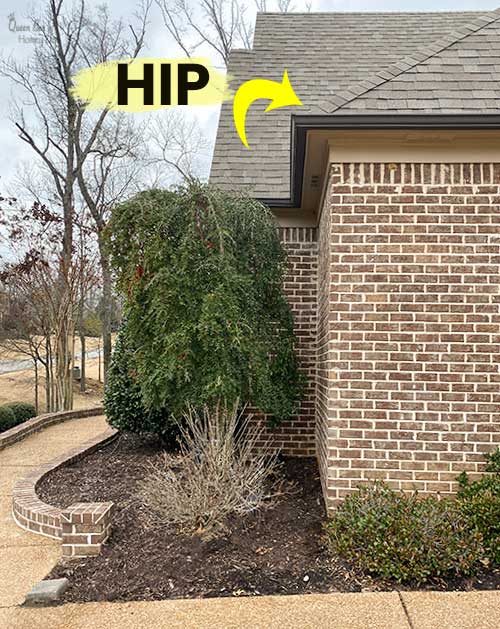
Note – Because of the way that the roof shingles meet at hips and ridges, you may find it necessary to notch out the portion that would slide beneath the hip shingles.
For gutters with splash guards installed, you may need to manually remove accumulated leaves from the surface of the gutter guards a few times per year.
I have one spot where the leaves gather into a small pile, but the wind generally removes them without additional help from me.
Finishing the Endcaps
Normally, you can just slide the gutter guards up to the endcaps just like you do for the rest of the roofline. However, I want to share with you the way that I customize these to make them squirrel proof.
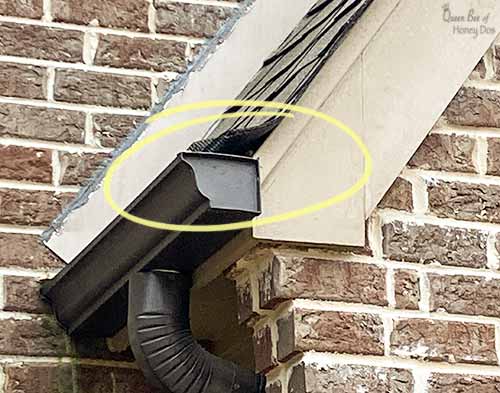
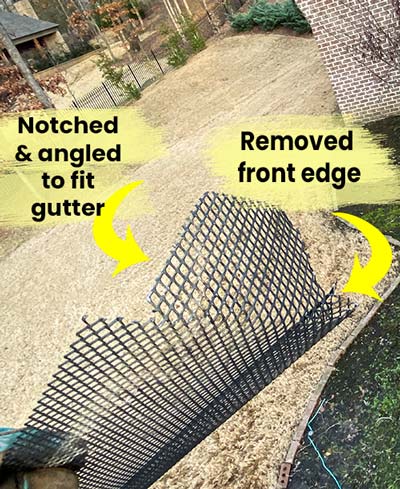
To solve this problem, I cut and angle the gutter guards so that they close off this access point. It will be different for each roof pitch, so unless you are good at eyeballing angles, you will need to create a template. Cardboard can be used or (what I do) use a small section from one of the gutter guards.
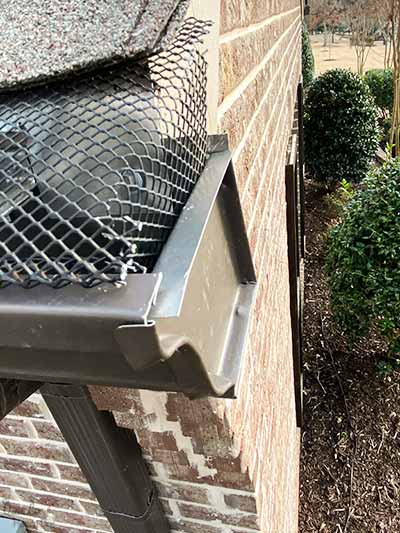
The final result will require about 3″ of the locking edge to be removed. Then, miter the interior side at an angle that will fit inside the gutter (should be the same as roof pitch). Fold the flap down. Then, install the gutter guards as usual.
Safety First
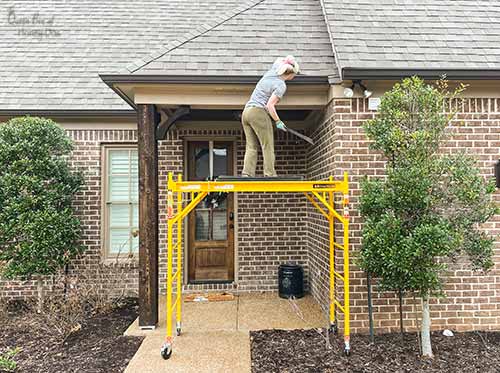
As with anything, you should always take precautions to be as safe as possible. A few things that I use when doing roofing work (or any work that requires height) is scaffolding and ladder stabilizers.
I can’t tell you how much more comfortable it is to do work like this from a scaffolding. If you are installing gutter guards yourself, you may want to consider working some scaffolding into your budget.
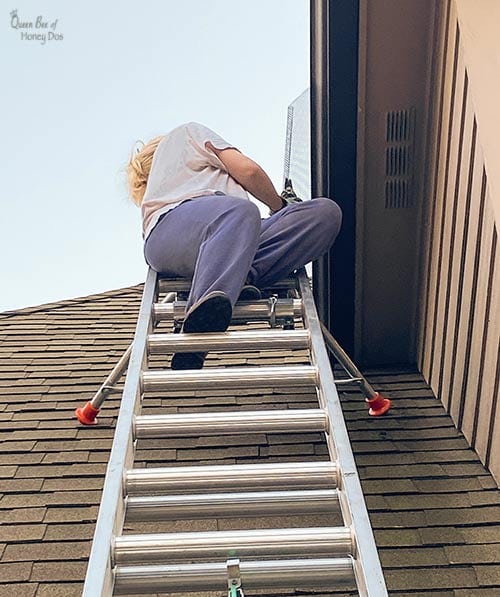
If you plan to do most of your work from a ladder, I highly recommend getting a ladder stabilizer.* The one that I use allows me to rest my ladder directly on the roof without touching the lower gutters. The feet grip and keep the ladder from shifting.
It also holds the ladder safely away from the window frames so that I can better access the gutter above them. Without the stabilizer, it is hard to access the gutter from above.
This device helps tremendously when I need to reach second-floor areas or above the dormers. I can’t recommend it enough for anyone needing to do roof work.
Final Comments
You should always install the gutter guards that best fit your specific situation. Keep in mind, though, that there is not any one type that will solve every problem. However, having them will definitely make life easier for you.
I am so pleased with mine and even more happy that I haven’t had to do any gutter cleaning since installing them.
John says
Thanks for vital information. I like the fact that no screws or adhesive or clips are used.
For the past 40 years I have been climbing a ladder to remove debris, my wife recently said. Honey I don’t want you climbing the ladder any more please get guards for the gutters.
Rachel Lynn says
Yes, guards will definitely reduce the risk brought on by annual ladder climbing.