I have been wanting to make a distressed antiqued mirror set for awhile. Probably like most, I saw those cabinets on an episode of Fixer Upper and got the bug to have my own antique mirror.
Since I am currently in the process of working on my fall decor, this seemed like a great time to get started on the build. Cause, what goes better with Halloween decor than some ancient-looking distressed mirrors?
If you love vintage decor or if you just like to have some trendier pieces around your house, this is probably a good DIY project for you. This is also an easy woodworking piece that looks very impressive.
(This post may contain affiliate links (*). That means that I make a small commission from sales that result through these links, at no additional cost to you. You can read my full disclosure here.)
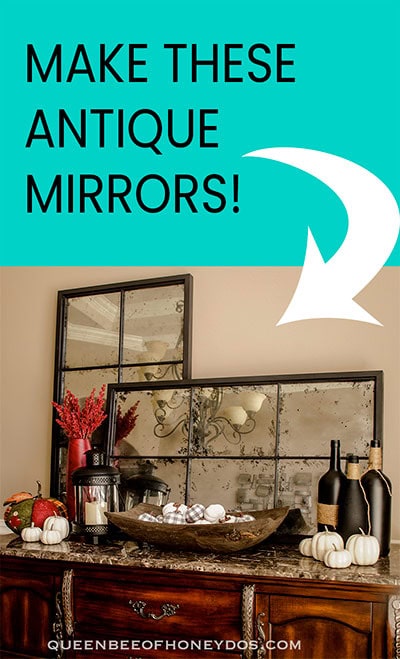
After a bit of searching for the best material to create the antique look, I ended up deciding on building a couple of large, framed, sectional mirrors. I priced these out from other home decor stores and couldn’t find anything this substantial for less than several hundred dollars each. Most were in the range closer to a thousand dollars for a two-piece of this size. So, this turned out to be an amazing deal!
Materials to Make 1 Distressed Antique Mirror:
- 1/2″ plywood cut to 20.75″ x 37″
- 2) 1″ x 2″ x 8′ boards (cut to frame size)
- 1/4″ x 1/2″ trim
- 6) 10″ x 12″ pieces of glass
- Krylon Looking glass spray paint*
- flat black spray paint
- Krylon metallic gold (optional)*
- This Gorilla glue*
- vinegar
- spray bottle
- painters tape*
- latex caulk*
- wood glue
- lint-free paper towels
- latex gloves*
- paint or finish of choice for the frame
How To Make a Distressed Antiqued Mirror…
Before I started antiquing my glass, I did a practice round. I highly recommend that you do the same to get a feel for how the paint lifts and how the water bottle disperses the mixture (more on that in a minute). It is quite easy, but I was glad that I did a trial run-through.
I purchased my glass from Lowes, but you can also buy them from Home Depot or a local glass shop. I would point out that the glass from Home Depot comes in a cardboard container with the cardboard glued to the glass. I don’t know why that is, but it is something to consider before making your purchase.
Regardless, the big-box store glass runs almost $3 each. I wouldn’t pay much more than that for each pane. However, I also do not recommend using these in anything other than decor. They are not tempered and would be dangerous in cabinets, doors, or windows.
For your convenience, and also because I really think that you need to see this as it happens, I have included the whole video on how to make a distressed antique mirror. If you plan to replicate this project, please watch how I do each step and read through the instructions to help clarify.
Antiquing the glass:

Start by mixing 1 part vinegar to 2 parts water in your spray bottle. Then, while wearing your latex gloves, thoroughly clean the side of the glass where you will be applying the finish. I can not stress this enough. Every fingerprint, streak, and speck of lint will show up. So, get those glass pieces ultra-clean!
Next, apply a small spritz of the vinegar solution to the glass. Keep in mind that wherever the solution lands will have a distressed look. Plan accordingly. Droplets will cause a tiny bubble effect to appear which is common in antique mirrors.
It took me a few practice spritzes to get a feel for how the water would disperse. I ended up having to step back away from the glass and just barely squeeze the trigger. A full trigger pull was completely misting the glass and I didn’t want that. I only wanted some small droplets scattered over the surface.
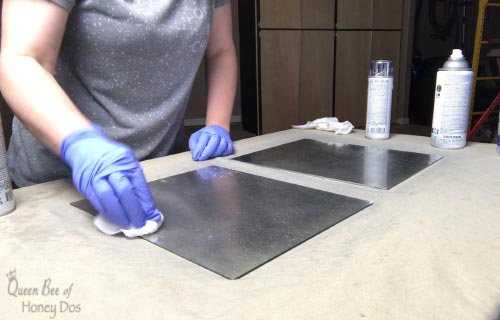
Allow the first coat to dry for about 60 seconds, and then reapply several successive coats allowing those to dry between each coat, as well. It should take 3-4 coats to get a semi-opaque finish. You don’t want it to be completely opaque at this point.
Once the last coat of Looking Glass has dried, use your lint-free paper towels and carefully blot away the vinegar solution. Then, use the paper towel to distress the outer edges of the glass.
Use a blotting motion to lift and remove portions of the spray paint. If you notice that the paint is not lifting easily, apply a small amount of the vinegar solution to your paper towel and continue distressing.
You can continue to add layers of the Looking Glass paint with distressing in between. I find that the initial distressing is generally plenty and produces a very nice result.
To incorporate some of that coppery look that some antique mirrors have, you can very lightly go over some of the distressed areas with a coat of Krylon’s metallic paint. A small amount of this will go a long way. Practice doing this during your trial run to see how it looks.
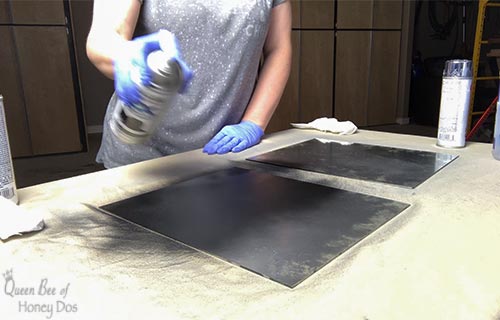
Finally, you need to seal everything in with the flat black paint. Apply 3-4 light coats over the paint in the previous steps. This is what gives the mirror its darkness and it also helps to protect the finish. Allow the glass to dry completely for 24 hours before adding them to any frame.
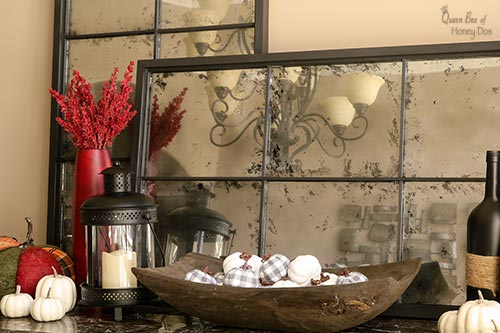
You can see more how the different layers affect the finish in this cropped image. The blacker distressed areas are where I removed most of the mirror paint. The lighter (grayer) distressed areas are where I added back a very light coat of mirror paint to areas that had previously been distressed.
I didn’t add any of the gold paint to this piece, but the warm coloring in my room makes it appear almost as if I did. If you have a cooler paint color in your house and you want to get that bit of coppery tone in your mirrors, you can add a very light layer of the gold before applying the black paint.
Building the Frame…
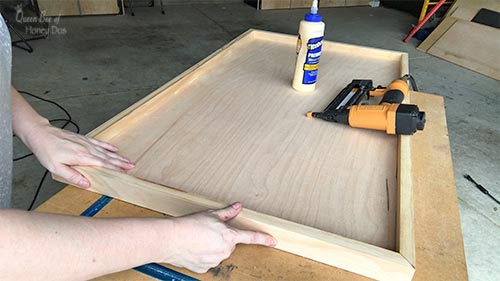
The next step to make this distressed antiqued mirror is to build the frame. When I was deciding on a design for this frame, I wanted it to be something that anyone could achieve, but I also wanted it to look nice. So, this is what I came up with.
First, you will need to frame out the plywood sheet by cutting down the 1″x2″ boards to size. I decided to miter the corners on mine, but if you do not have a miter saw or you feel that this is beyond your skill set, you can always do butt joints. In which case, you should butt the top and bottom of the frame inside the side sections.
To attach the frame pieces, I applied a bead of wood glue along the bottom edge and used my brad nailer to tack them in place. If you do not have a nail gun, you can clamp the sections in place and wait for them to dry.
Next, I cut down the trim to fit inside the frame. This is what will make the grid lines. If your measurements have been correct so far, you should need 3 pieces cut to 37″ long and 8 pieces cut to 10″ long.
Adding the Mirrors…
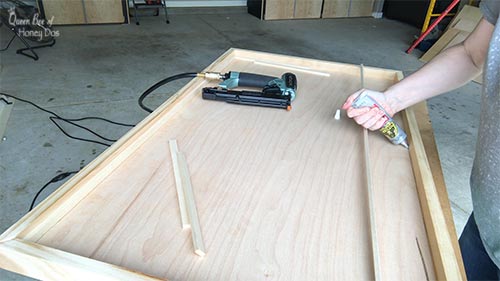
Start by applying a thin bead of gorilla glue along the inner seam of the frame. Then, press the trim piece into the frame along that side. I used my pin nailer to hold it in place, but if you do not have one you can just hold the trim for several minutes until the glue dries. Repeat for one of the 10″ grid pieces – attaching it along the adjoining side of the frame.
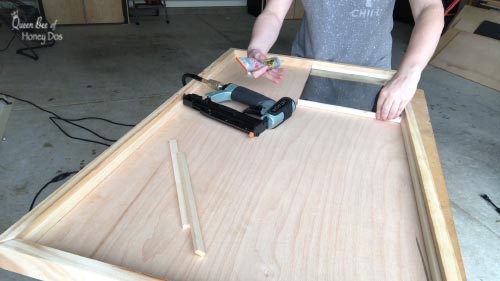
To attach the mirrors to the frame, apply a very tiny amount of gorilla glue to the back corners. Try apply the glue to a location that is heavily distressed. Most glues will eat through the finish of this paint. The gorilla glue is one of the only brands that I found that doesn’t.
However, if you apply too much, it will leave a visible spot. Applying it to a distressed area will help camouflage alterations in color. Luckily, it holds quite well with just the smallest amount. I also found that it helps to not lay it out in a perfectly round dot. Instead, lay an odd-shaped dollop.
Once the glue is in place, lay the first mirror into the frame against the two trim sections that you previously attached. Add another 10″ trim piece along the bottom edge of the mirror to create another grid line.
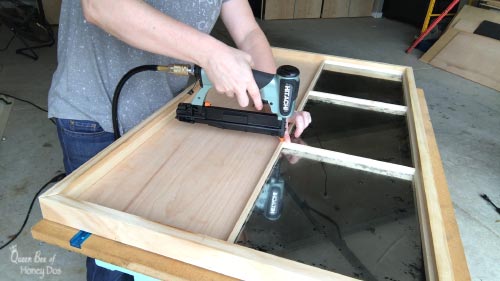
Continue adding mirror panes and 10″ grid sections down one half of the frame. Then, attach a 37″ trim piece to the side of the mirrors without a grid. This piece would create the center grid of the frame.
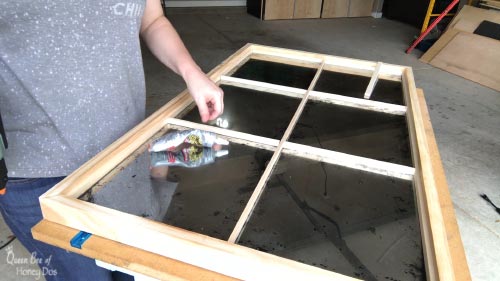
Add the last 37″ trim piece to the opposite side of the frame. Then start adding the mirrors and 10″ grid pieces in the same fashion as you did for the first half.
On this side, I recommend that you glue everything in place before using a pin nailer (if you choose to use one). That way, you can make small adjustments to the layout if things aren’t as square as they should be.
Once everything is in place, you can go back and add those pin nails. If you don’t have a pin nailer, just press the grid in place and hold them until the glue solidifies. Let the glue cure overnight before proceeding to the final finish.
Finishing the Frame…
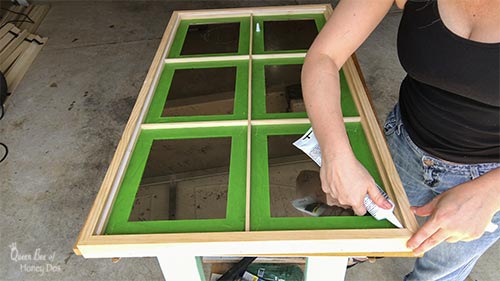
Once everything has cured overnight, you can add a finish to the frame. If you are painting your frame, you will need to caulk the seams. I prefer to use tubed caulk when working on intricate areas. But first, be sure to lay down some painter’s tape to protect the glass.
Once the tape is in place, apply a thin bead of caulk along the seams and smooth out with your finger. You will need a paper towel or an old rag for this step. Allow the caulk to dry and then paint.
I decided to paint my frames black. I had some leftover paint from when I converted my storage shelves into cabinets. So, I took this opportunity to use up the remainder of that paint.
If you decide to apply a stain finish, you should fill any noticeable gaps with wood putty instead of caulk. I have a few good tutorials on getting different finishes. One of my favorites is a weathered gray finish that uses both stain and white paint. Remember to topcoat the stain with two coats of wipe-on polycrylic.*
Final Comments…
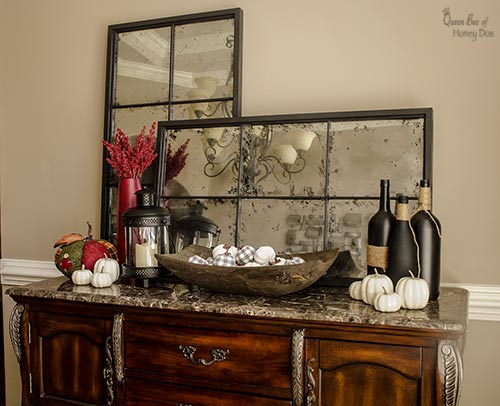
That’s it. An easy to make, distressed, antiqued, mirror that anyone can do! You can take this plan and create all sorts of antiqued mirrors. It also works for standard mirrors if you want to purchase a box of those instead. If you likeed this DIY, please be sure to share this with your friends!


Adrian Bell says
Gotta say the master bedroom and the living room are my favorite! So cozy. Perfect to chill at over coffee. Thanks for the tour! Just bookmarked for future reference.