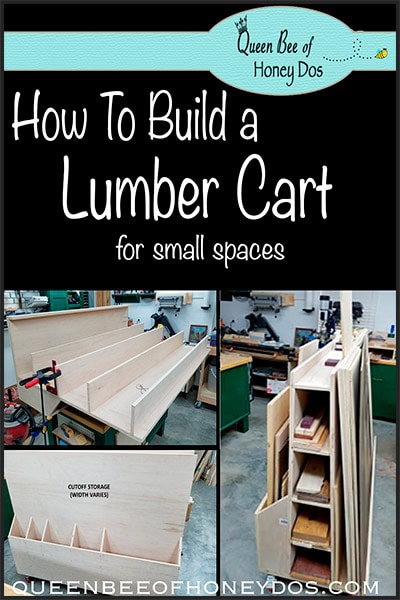
If you do a lot of woodworking projects, you likely have accumulated a lot of leftover lumber. After a while, all of that lumber can take up a lot of space, especially if you are already working in a small area. Having a good storage and organizing system will not only keep your space neat and tidy, but it will also keep the lumber in good shape and make your work zone more efficient. A good lumber cart is one of the first steps to taking back control of your workshop. Today’s project will show you how to build a lumber cart for small spaces.
(This post may contain affiliate links (*). That means that I make a small commission from sales that result through these links, at no additional cost to you. You can read my full disclosure here.)
How To Build a Lumber Cart for Small Spaces

If you have been coming around my blog for any length of time, you may have come across one of my collaborations with my friend, Dale. As you may recall, Dale has collaborated on a few projects here, including a trivet made from dowel rods, and an adorable toy boat that is a perfect team project for you to do with your child.
I love the work that Dale does. He is always meticulous with his woodworking and, most importantly, he doesn’t try to skip corners. So, when working with him, I always know that I can depend on him to bring his “A” game. This week, Dale and I are bringing you this lumber cart.

How This Project Got Started…
Dale’s workshop was beginning to have an overabundance of leftover plywood collected from other previous jobs. He badly needed a lumber cart that would be big enough to hold large sections of plywood, but he didn’t want anything that would take up too much space in his workshop.
Like many of us, we dream about a big, mammoth sized lumber cart that can hold an entire hardware store’s worth of lumber. (Maybe something like the giant one that Ana White made). But, for most of us, workshop space is premium real estate. We can’t afford to devote too much for storage.
Most lumber carts are over 30″ wide. If you have a small workshop or, if like me, your garage doubles as a workshop, you may not have 30″ of space. Most garages will allow for a little over 2 feet of space between an automobile and the wall. With that in mind, this lumber cart can park in almost any work area. (as can my convertible workshop table.)
Materials & Cuts…
For this job, you will need:
- 3/4″ plywood
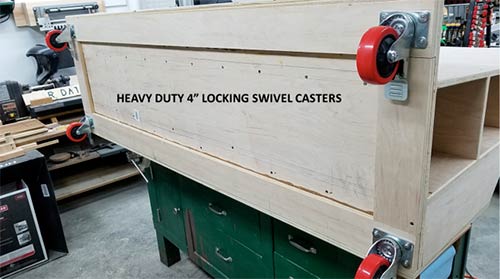
- 4 heavy-duty locking casters* ( I recommend these. If going with a different brand, don’t skimp on the quality. They will be holding a heavy load, and there is nothing worse than a weighed-down lumber cart that won’t move)
- wood glue
- wood screws
From your plywood, you will make the following cuts:
- (1) 72″ x 46 3/4″ (with a 3-degree angle on one side of length. Note – See instructions below.)
- (1) 72″ x 46 1/2″
- (1) 72″ x 26 1/2″
- (1) 72″ x 19 1/2″
- (3) 72″ x 4″
- (2) 18 1/2″ x 4″
- (6) 24 1/2″ x 6″ (with a 45-degree angle on one end)
- (1 of each) 72″ x 8″, 7″, 6 1/4″, 5 1/2″ (with a 3-degree angle on one side. NOTE – See instructions below)
How To Build a Lumber Cart – Instructions…

To begin this project, you will need to build the base. This part is assembled with nothing but wood and glue. However, if you do not have enough clamps to pull this off, you can always use a combination of glue and wood screws or even a brad nailer. The idea is to just get things to stay in place.
- Glue two of the 72″ x 4″ pieces and the 18 /12″ x 4″ pieces to the bottom of the 72″ x 26 1/2″ section. Allow it to dry. This will be the bottom of the base.
- After the glue has dried, it is a good idea to mark the locations of where you want the casters to go. Predrill any holes that will be needed for the casters, and then set them aside for later.

After the base has dried enough to continue, flip it over and attach the 72″ x 19 1/2″ to one long side of the base. You will need to predrill and use wood screws for this part. You can also use glue along the seam for extra strength.
Repeat the same process for the other side of the base, except this time, you will be attaching the last 72″ x 4″ piece. From this point on, you will be working from left to right (or from the tall side) for the remainder of the project.

Working on the left side (tall side) of the cart, begin attaching the 24 1/2″ X 6″ pieces to the left side. These will form the dividers for the cut-off’s compartment. As mentioned in the cut list, you should have already placed a 45-degree angle on the end of these pieces. This should result in the connecting side sitting at or just slightly below the frame that it is being connected to. (See image above).
Space the dividers to fit your personal desired compartment sizes. To attach them, predrill through the exterior side of the cart, and use wood screws and glue to attach. Then, predrill and screw through the bottom of the base.

Next, you will need to route 4 dados into the 46 1/2″ plywood. Each dado should be 3/4″ wide and 1/4″ deep. Space them so that you have one dado 2 1/2″ from the top end and space the remaining at equal distances. That should be 11″ on center for each of the remaining 3 grooves.
Tip – if you do not have a router, you can do an alternate step. Instead of routing dados, you will need to attach ledger strips. I recommend using 3/4″ strips adhered with glue and screwed in place. Place them so that they are located just below where the dados would have been located. These will serve as supports for the shelves. If using this method, make sure to look ahead and fully understand how the unit will go together.

Then, predrill holes through the dado side of the plywood sheet and into the dividers. Attach with wood screws. (Tip – To balance the cart and keep it from tipping, use extra wood blocks to support the plywood while it is tilted on its side).

Next, glue the shelf sections to the dado grooves on the plywood. The flat cut should be placed in the dado with the angled cut facing away. Notice in the image above how the shelves decrease in width as you move from the bottom to the top of the cart. Place your shelves accordingly with the widest side of each shelf facing down and the narrowest side of each shelf facing the up.
Scrap wood blocks and various clamps are used to hold the shelves securely in place while they dry. However you go about completing this step, just make sure that your shelves are square. Screws are added through the plywood for the top three shelves for extra strength.
NOTE – You may find that 3 degrees won’t provide enough slant to your cart. If so, you can increase that to something more suitable to your taste. I generally like 5 degrees, but this is really just a preference and not something that will detract from the integrity of the cart.

This cart has a 3-degree angle along the bottom of this plywood sheet. However, if you have chosen to increase your angle on the shelves, you will need to increase your angle on this sheet of plywood, as well.
Attach the last plywood section to the shelves and through the bottom of the base. Make sure to predrill and then screw in place.

Finally, add your casters! Make sure that you lock them before trying to remove the cart from your workbench. Otherwise it will start rolling on you. You will likely need a helper to make the transition from workbench to floor because this sucker is HEAVY!

The screws can be puttied over and the cart can be finished if you like. You can also just leave it as is and start sorting your lumber. As you can see above, Dale has already made use of his cart and his workshop is much more functional because of it.
Final Comments…
I hope you all find this helpful. Please be sure to leave a comment below and let Dale know how much he is appreciated! If you want to interact with Dale more, you can find him over on my Facebook group board – Build-FIx-Do! He helps me moderate and run this group, and we welcome all woodworkers (beginners and professionals) as well as home renovators. Feel free to join even if you just want to learn!

– PIN IT –


Bryan Craft says
Thanks for the hard work you put in this project. However your 45⁰ angles are wrong. In order to get the 45⁰ from the corner down to 18 ½” your overall length needs to be 24 ½” since your board is 6″ wide.
Rachel Lynn says
Bryan, Good catch! My partner in crime (Dale) was keeping track of the dimensions, and I am sure that he just made a typo in the notes.? But, absolutely! The opposite length on a 45 degree angle will equal the width. I have made the alteration in the cut list above. Thanks for the heads-up!
Larry says
How many 3/4” plywood sheets are needed? I assume more than the 1 it says?
Rachel Lynn says
Larry, I believe it just says, “plywood”. The number of sheets will greatly depend on how you layout the cuts. It’s been awhile since this project was completed. But, I believe it will take 3-4 sheets. Again, depending on how you layout the cuts.
Danny says
Do you by chance have a pdf of the instructions and a cut list available?