Sometimes you just need an outlet in a place where one doesn’t exist. Fortunately, adding an extra outlet is not a difficult DIY. So, if you are looking to add an extra plug in your home, you are in luck. Because, today I am going to show you how to add additional outlet plugs.
(Disclaimer: Given the nature of this post, I highly recommend that you read my disclaimer statement concerning this blog. Electrical work is nothing to take lightly. If you feel uncertain in your abilities, I would recommend consulting with or acquiring a professional’s services)
How To Add Additional Outlet Plugs…
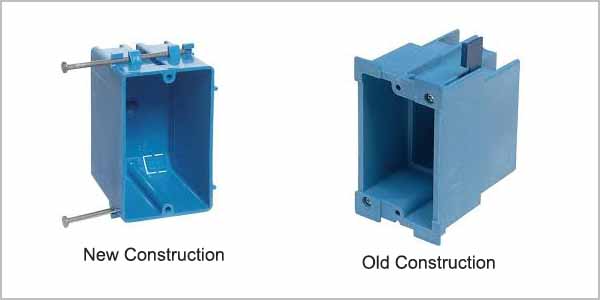
Before we get into how to add additional outlet plugs, first we need to go over the what. For starters, you need to know what type of box and what type of electrical wire to purchase. There are two types of outlet boxes – a new construction and an old construction. The new construction boxes are made so that they can be nailed through the side of a stud. However, since you are wanting to know how to add additional outlet plugs, that tells me that this is an old construction.
Old construction boxes do not have nails. Instead, they have tabs that (all things being perfect) hold onto the sheetrock. Unfortunately, all things are not perfect, because these tabs rarely hold well. (I will show you how to deal with this in a bit, but first let’s go over the wiring.
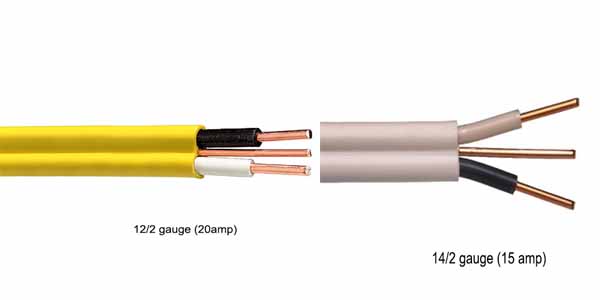
It is very important that you use the correct wire when doing electrical work. The best way to know what you need is to look at what is being used on the outlet that you will be jumping off of, and use that same wire. For the most part, you will use either a 14/2 or a 12/2 Romex. Typically, 12/2 Romex will have yellow sheathing, and a 14/2 Romex will have white. If you have an attic or basement, I suggest that you check the wiring to see what it says on the sheathing. But, however you determine the gauge, don’t guess.
These wires will contain a black (hot), a white (neutral) and a green/tan paper wrapped (ground) wire. If your electrical has an additional red wire, that just means that you have either a 12/3 or 14/3 wire. But again, read the sheathing.
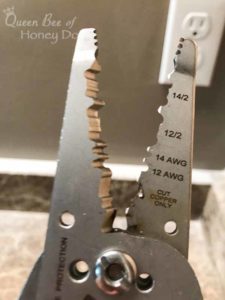
In addition to an outlet box and Romex wire, you will also need a few other items. You will need something to strip and cut the wires. I highly suggest that you use a tool designed to do this. You need perfect strips with undamaged wires, and the best way to get that is with something like this tool above. This is what I use (amazon affiliate link), and as you can see it has markings to let you know exactly where to place the wire for stripping and cutting.
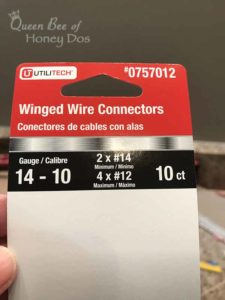
You will also need a way to connect the wires. I recommend using cable connectors. Some people still like to use electrical tape. I prefer to use the connectors and then wrap beneath that with the electrical tape, but the tape is purely for the purpose of holding the wires together neatly. If using connectors, make sure that you get the appropriate size. The box will tell you the gauge and amount. For example: on the above box, you could have up to 4 (12 gauge) wires in one connector.
Can You Add an Additional Outlet????
(Image by familyhandyman.com)
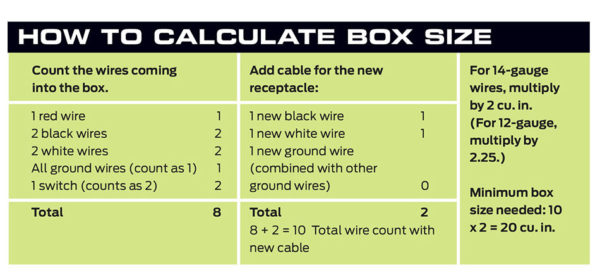
One other thing that you need to consider is can/should you jump off a particular outlet. Because outlet boxes are made to hold only a certain amount of wires, you will have to do a little bit of math to determine what size of a box that you will need. Just take off the cover of the outlet that you plan to connect to and remove the old outlet from the box. Now, count the wires and use the formula above.
For example: Let’s assume that I wanted to add an outlet with a switch to control that new outlet. My old outlet already has 3 black wires/3 white wires/3 ground. (or one line coming in, 1 line coming out, and one set of pigtails). I am using 12/2 Romex. I will be adding my new line – 1black/1white/1 ground to these, which will go out to the switch. So, 3+3+1+1+1= 9 (*2.25) In this situation, my old outlet box needs to be at least a size 20.25 to support what I want (or a 21 cubic inch). I would then need to calculate for my new outlet box.
You should also consider how many outlets are already on that same run. You do not want to have more than 1.5 amps per outlet. A typical rule of thumb is that a 12/2 gauge wire (or 20 amp) can have up to 10. In a kitchen, you would want to be more conservative with this number.
How To Add Additional Outlet Plugs…

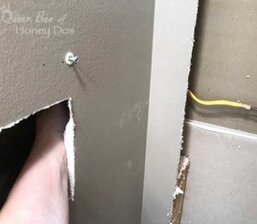
Now onto the good stuff. (Note – Make sure the power is off to the outlet before beginning). First, you are going to need to mark where you want the new outlet to go. Use a stud finder to make sure that you are between the studs and trace the new outlet box onto the wall. Then, cut along the lines with either a sheetrock knife or an utility knife.
You also will probably need to cut a hole in the wall to access the outlet/wire from which you will jump. In the image above, I have cut an access hole and am searching for the pathway to insert my new wire. (FYI: this is from my project on How to build and insert a medicine cabinet).
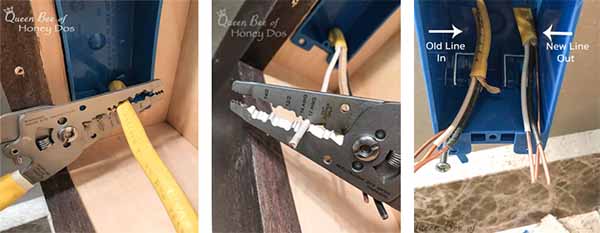
Once you have the wire through the wall to the new outlet, run it through one of the tabs in the electrical box. Next, remove the sheathing from approximately 4-5 inches of the Romex. You will notice that there are now 3 wires – one black, one white, and one covered in tan paper (the ground). You need to strip about 1″ of sheathing from the black and white wires.
In the last image, you can see how my old box looks with the original line on the left and the new line on the right. The center image is a new outlet box that I added inside a medicine cabinet.
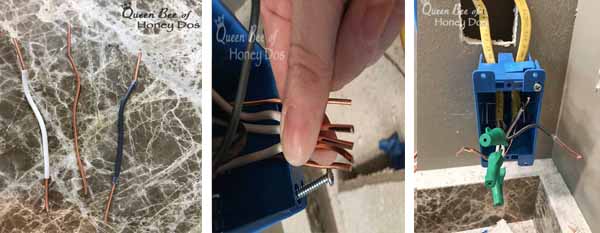
Next, you need to create some pigtails to connect the lines to your outlets. (Using pigtails is the standard used by most electricians. It prevents power loss down stream in the event that one outlet fails).
To create the pigtails, cut 5″ lengths of all three wires (black, white, and ground). Then, strip a 1″ section of sheathing from each end. (image 1)
Now, join one end of the white pigtail to the white wires coming out of the outlet box. Make sure that the wires are lined up evenly on the end. Then, connect them by twisting a connector onto the end. Do not twist them before adding the connector. The connector will do that for you. If you find it difficult to hold the wires in perfect alignment, use a bit of electrical tape (placed below the exposed copper) to hold the wires together. Then, use the connector.
Repeat the same process for the black wire and the ground wire. You should now have just one end of each pigtail left exposed.
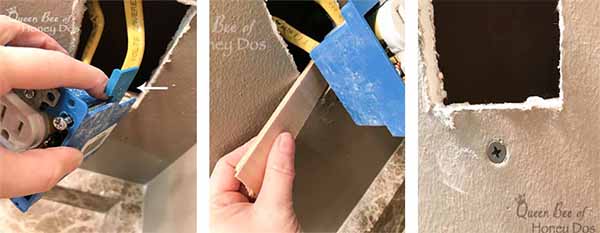
Remember our less than perfect world? Well, let’s take a closer look at those old construction boxes. They have these tabs that are “suppose to” hold tightly behind the sheetrock. However, unless your sheetrock is cut very carefully, it will not catch correctly. If you look closely at the bottom left corner of the hole, you can see where the tab came through.
To solve this problem, just take two scrap pieces of wood. Slip one into the hole at the bottom and attach it to the sheetrock with a sheetrock screw. Do the same for the top of the hole. Now, you can use a wood screw to attach the box, and forget those tabs all together. Just use a bit of Spackle to cover the screw area and touch up.
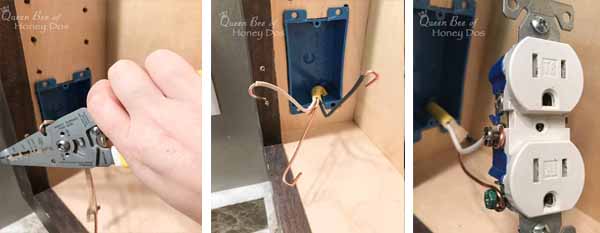
Now, we are going to connect the pigtails to the outlet. Let’s start by creating a loop on the ends of the pigtails. I use one of the outer holes in my stripper to do this. Once the loops are made, unscrew the bottom screws on your plug and attach them like so – black to brass, white to silver, and ground to green). If you have a problem remembering which wire goes where, just remember this – B to B and G to G. That only leaves the white wire and silver screw.
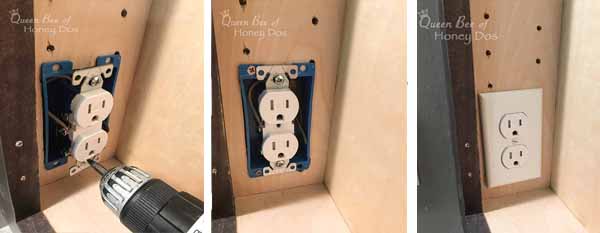
Finally, fold the wires into the box and attach the outlet. Then, place the outlet cover on the outlet and you’re done!
Final Thoughts…
Well, now you know how to add additional outlet plugs! I hope you were able to use this post to help you with one of your projects. If it helped, share it with your favorite social media. :-)

– PIN IT –

– PIN IT –


Terre says
I have a outlet that never worked can I just add a new outlet and close off the old? I don’t think the wiring in the old was ever connected.
Rachel Lynn says
If nothing is wrong with the wiring, you could put an outlet cover over the old outlet and jump off the line to your new location. It is also possible that the plug is just dead, in which case a new plug may be the easiest solution, assuming it is in close proximity to the location you want.
Sam says
Plug or receptacle? I though the plug was on the end of the wire that goes into the wall receptacle.
Rachel Lynn says
Sam, yes you are correct. It should have read “plug outlets” although receptacle would have worked too.
Donald Hoffmann says
I wanted to know if this will work in putting in a new light switch? The one in my shed was installed on the wrong wall and I wanted to move it to the other side of the door so that I can flip the light switch on when I come in the door and not have to open the door then reach around to the wall to turn on the lights.
Rachel Lynn says
Moving a light switch is just a bit different. You fist need to determine if the line (power) is coming into the switch first or coming in at the light. Typically, the line comes in at the switch and the load is run to the light. If this is the case, you would need to find a different line (power-in) located where you want the switch and jump from that to the new switch and take the load over to the light. This would require the old switch to be be eliminated at the light and capped and covered at the switch. If you are lucky, and the power comes in at light, you can simply run over and back to/from the new location. I recommend you do your research on line v/s load and how to connect switches. If in doubt about your abilities, call an electrician. It is a fairly simply job in most cases.
Shirley says
Do you have a tutorial on putting in a new outlet outside?
Rachel Lynn says
You would use the same tutorial with a few alterations. 1) If running the electrical cable over brick or any other exposed surface, encase it in conduit. and 2) Use a GFCI outlet and outlet cover approved for exteriors.
Pete says
I followed your post and added an outlet to my shower so I can plug my radio and listen to music while I am showering. It works fine when then shower is off but when I turn the water on it trips the breaker.
Do you have any advise how to solve this minor problem?
Rachel Lynn says
Do not put electrical outlets in your shower. 🤦🏼♀️
Anonymous says
Turn off the power first and double-check!!
Don says
I understand that the actual reason for pigtails is that the outlets are not UL listed as current-carrying devices.
Rachel Lynn says
It keeps the current flowing in the event that one outlet goes bad. Daisy chaining will result in everything downstream being taken out.
Robert Kwarren says
Can you share how to add a new outlet running wire through cinder block?
Thanks.
Rachel Lynn says
You need to run the wire through conduit.